ShaderGraph introTutorial
ShaderGraph Tutorial
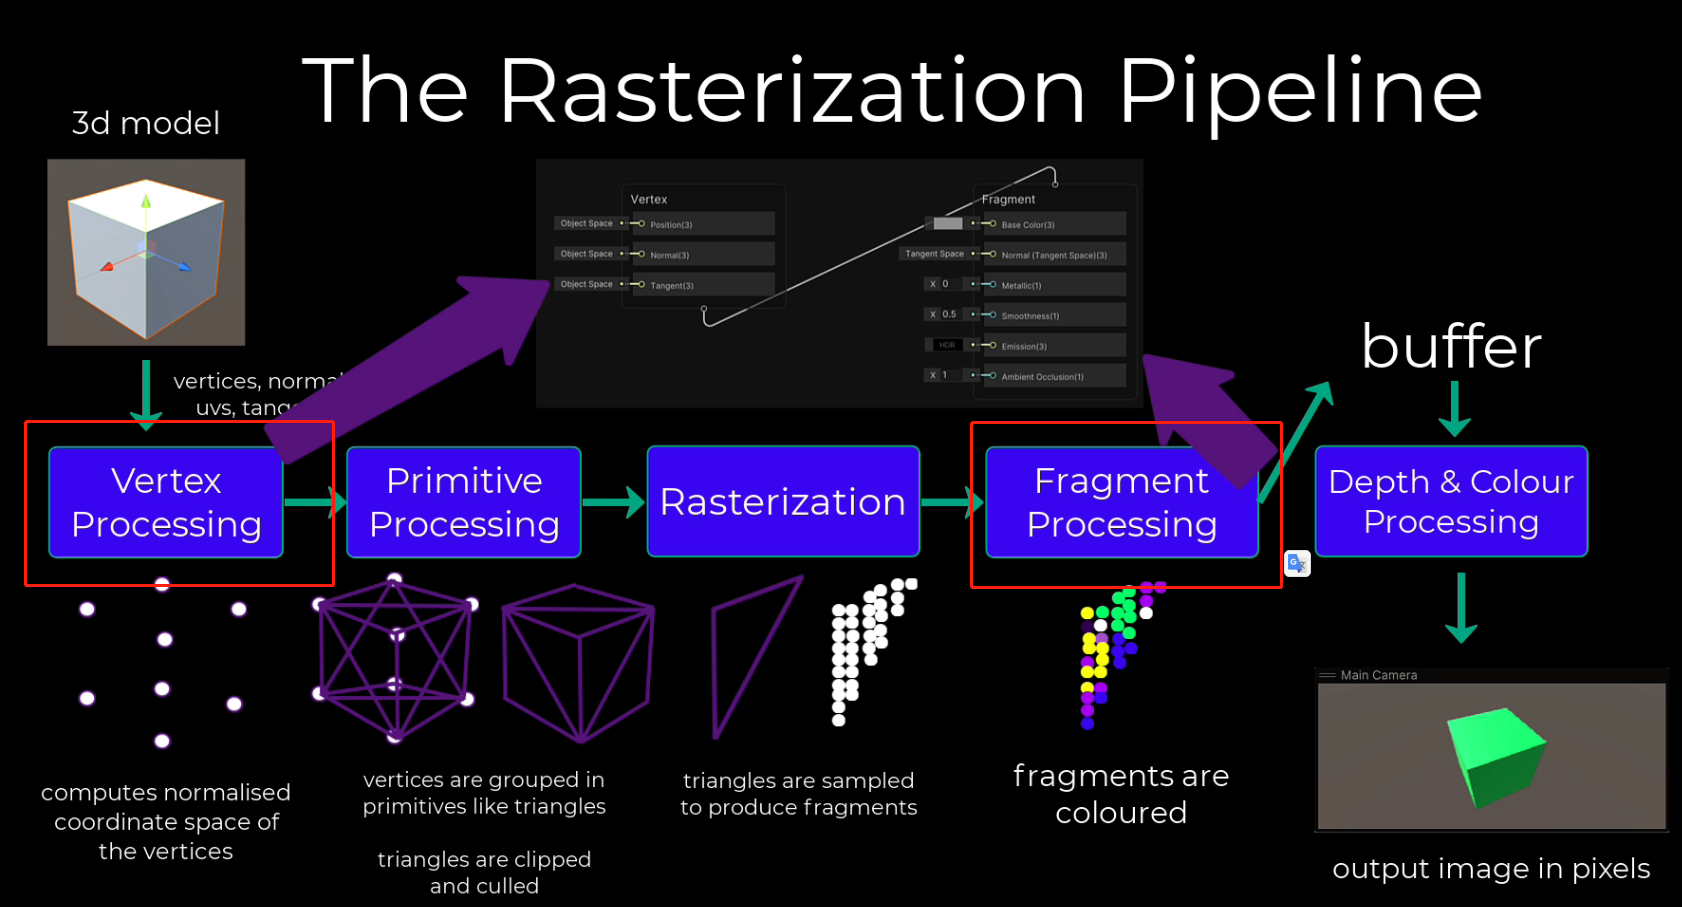
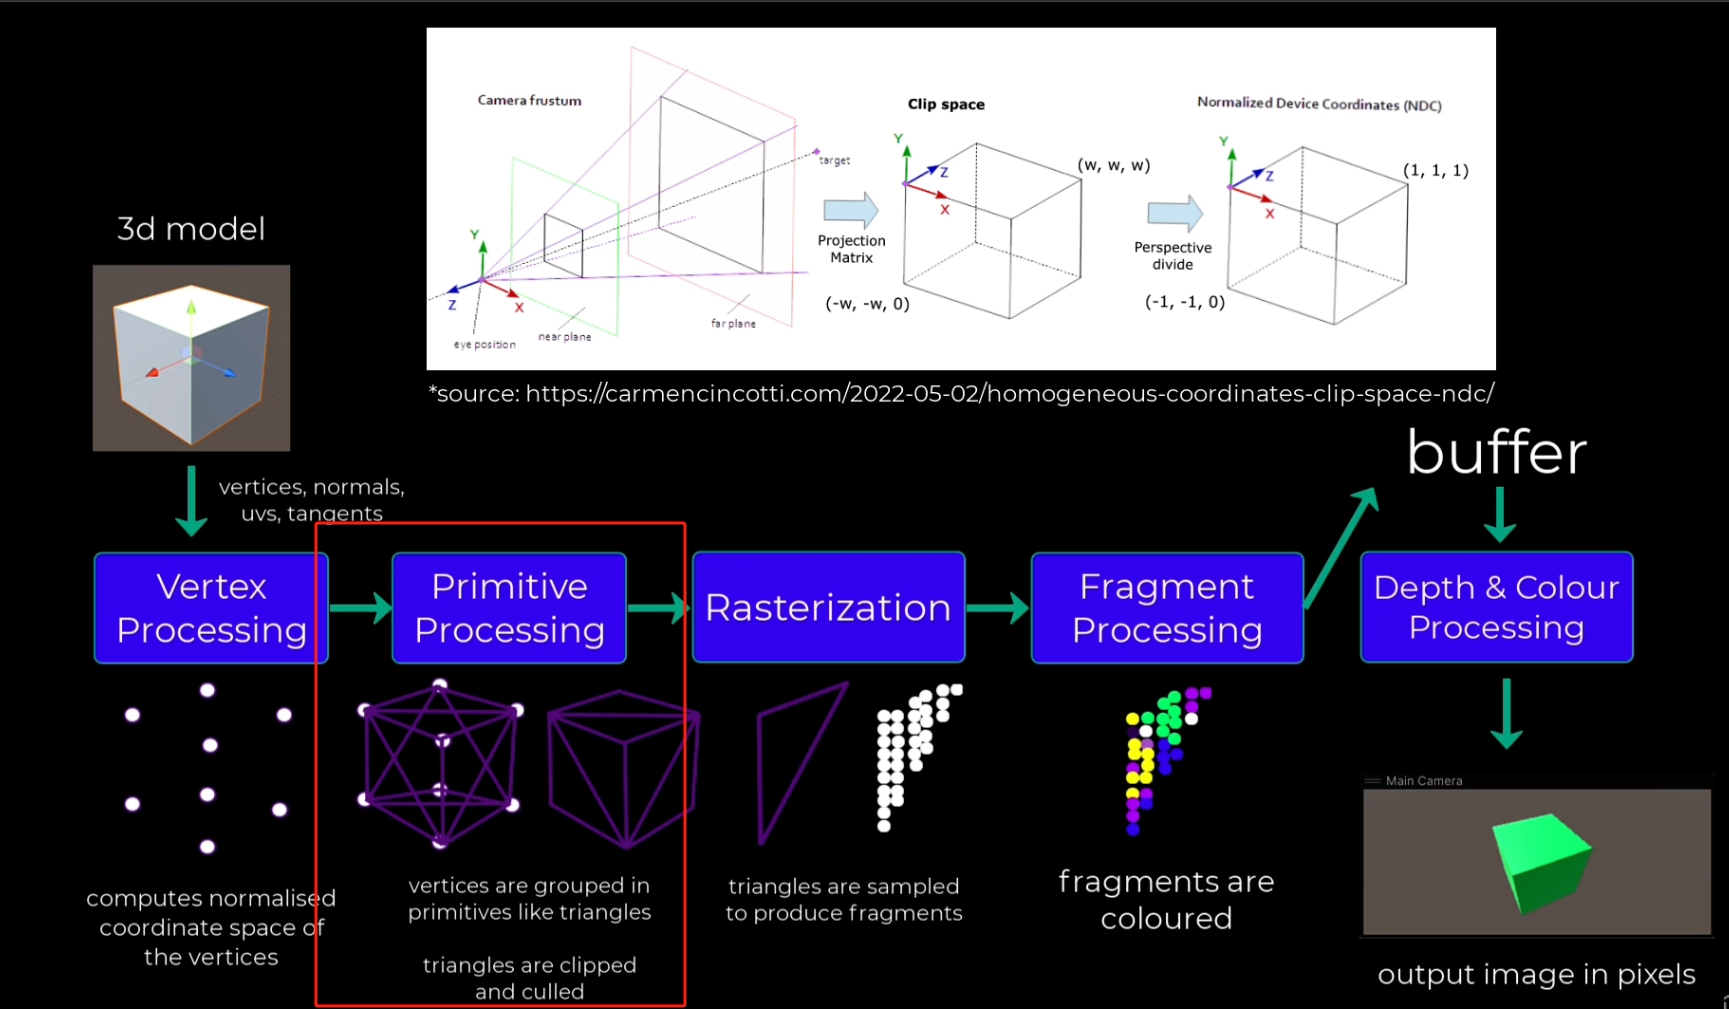
what is Vertex and Fragment - Rasterization
- Vertex -> mesh -> calculated by per vertex
- Fragment -> coloring pixel -> calculated by per pixel
- Vertex + Fragment = Master Stack
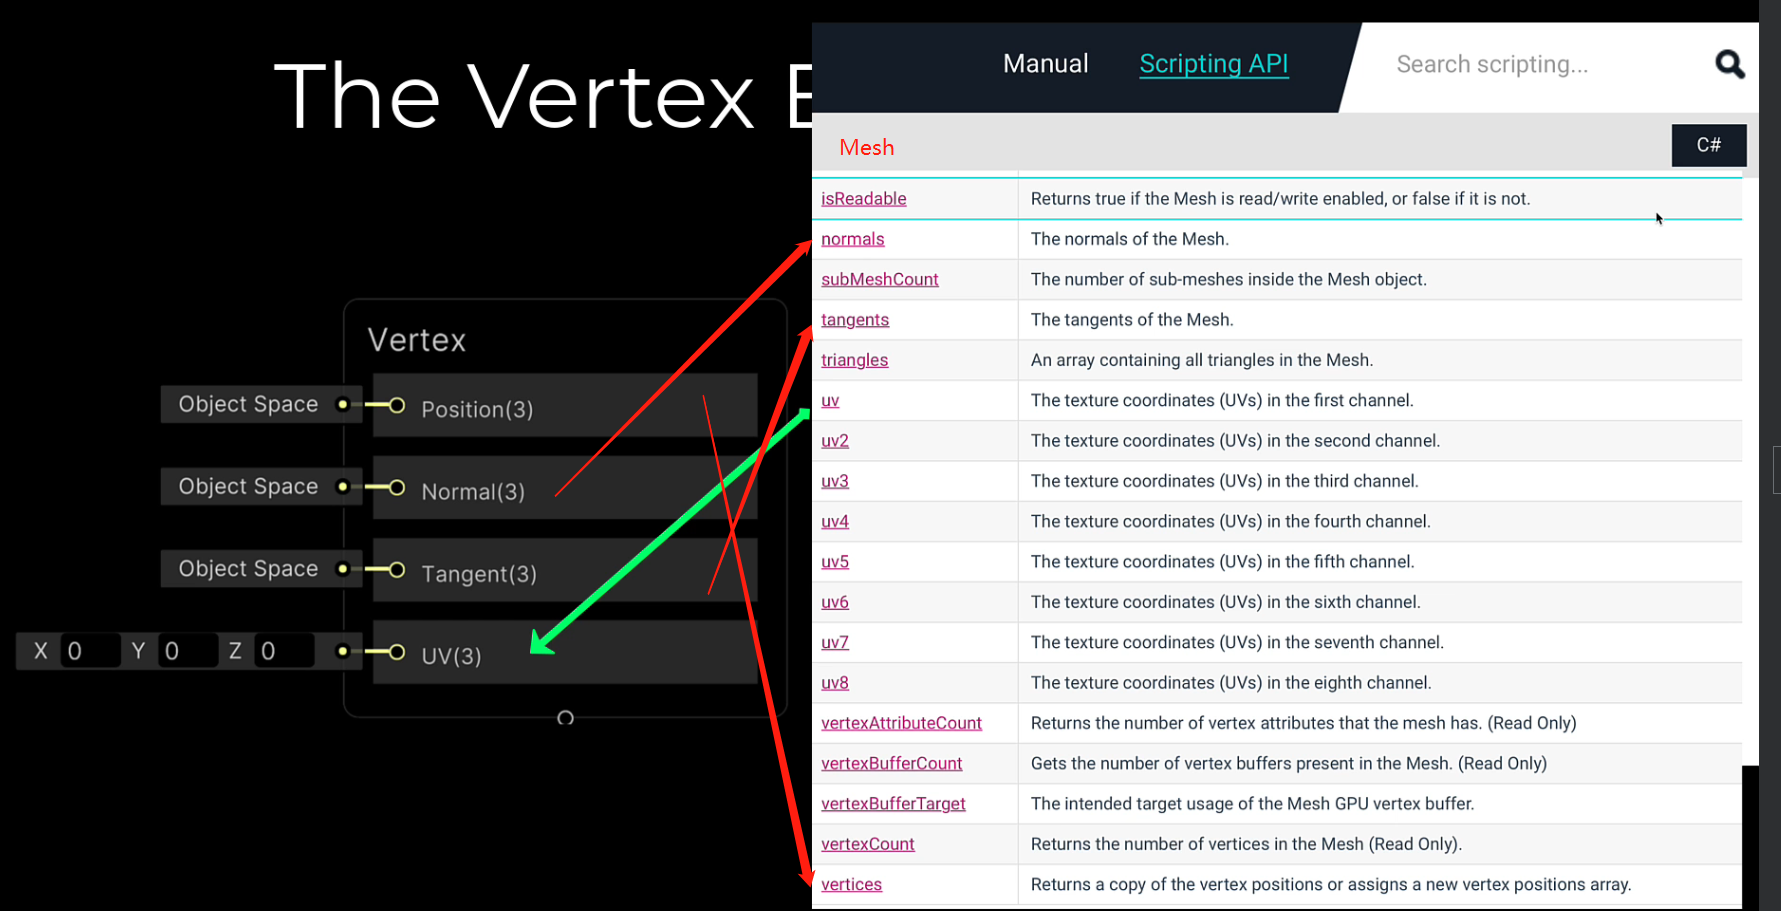
- Position(GPU parallel): operating on just one vertex, not a whole bunch of vertex is just the one. -> And we’re doing the same thing to all of them that are on this model.
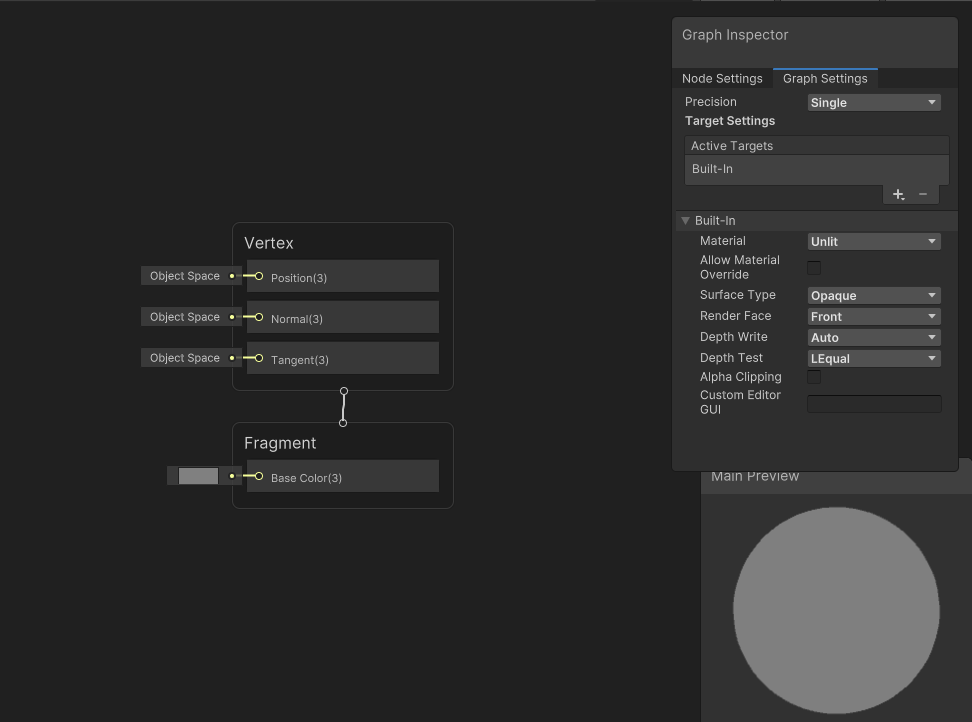
Built-in Unlit Shader
Position for Color
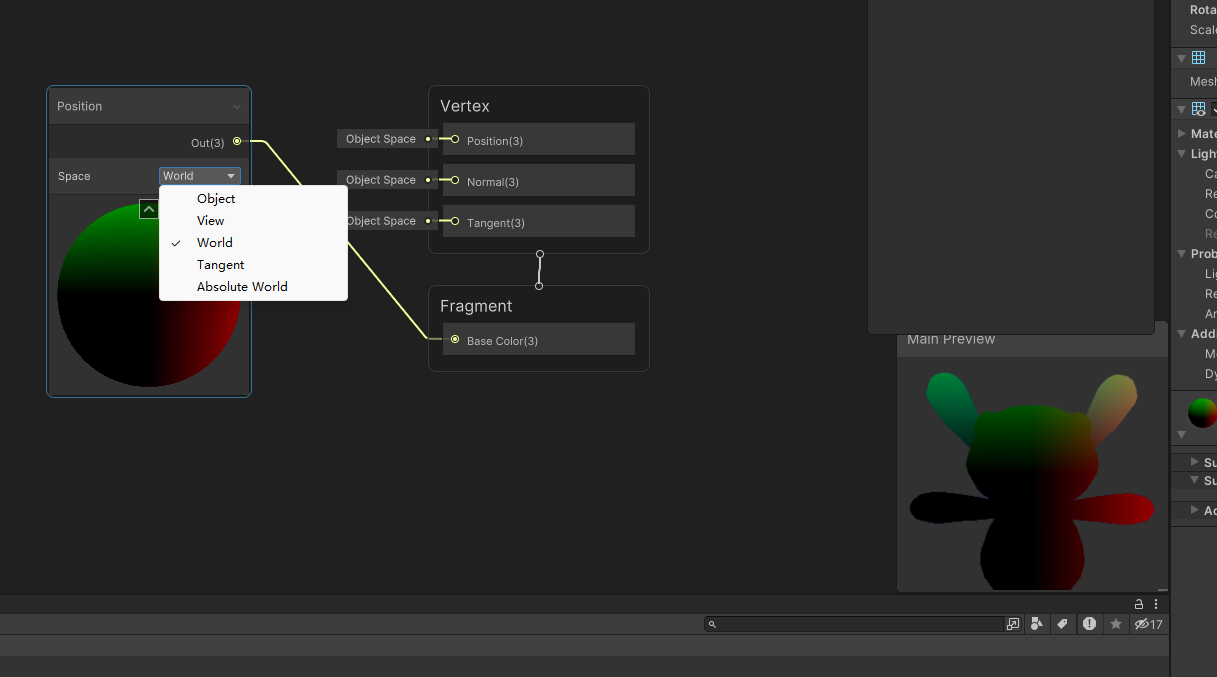
- view -> camera perspective -> front is black which is 0,0,0
Normal for color
vertex normal: average normal of all of around faces


- white -> upward
- dark -> downward
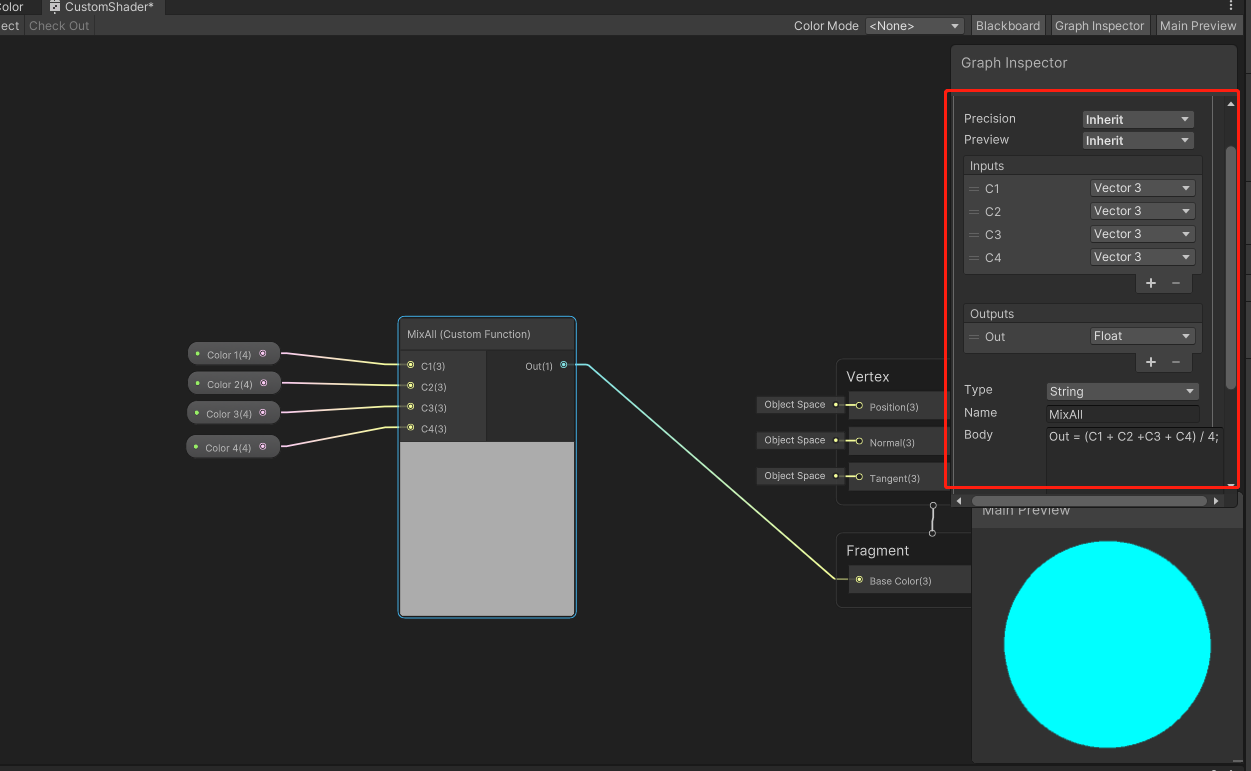
Mix Color
- add -> 1 -> whiter
- when add pure color
- prevent blow out -> get average
- multiply -> 0 -> darker
- when change the intensity of the color
- usually for lighting
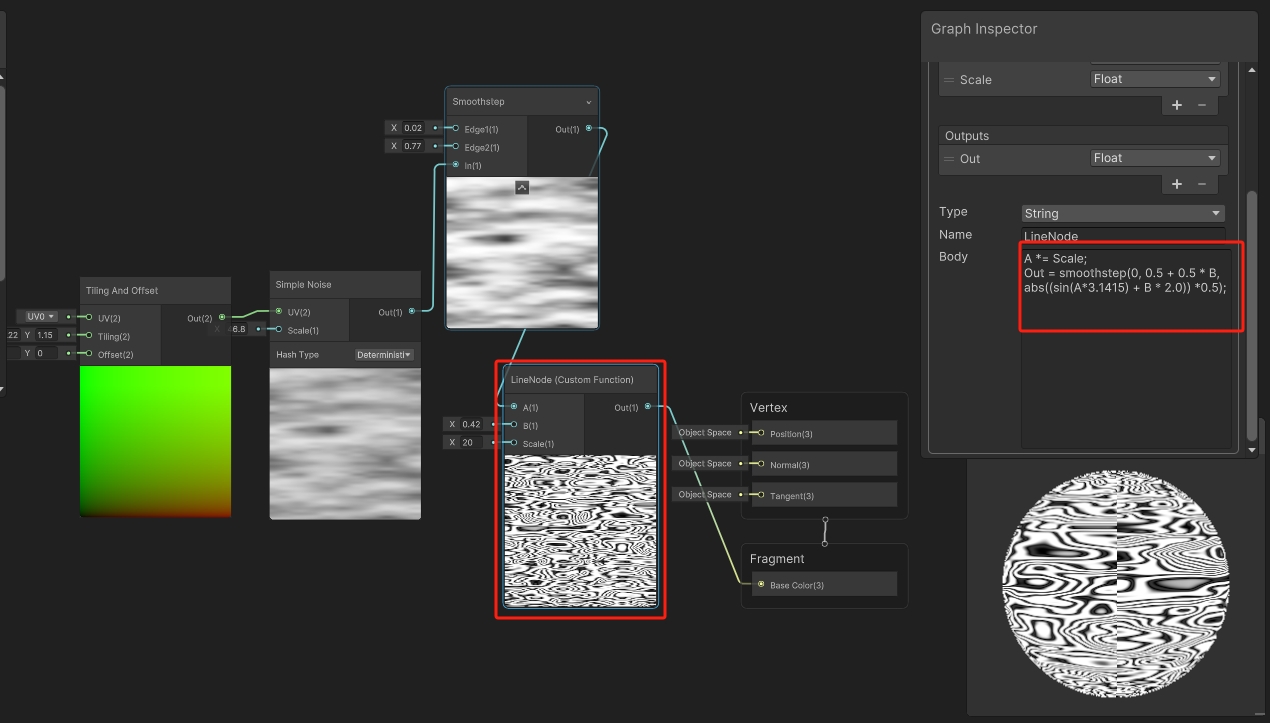
- Custom Function
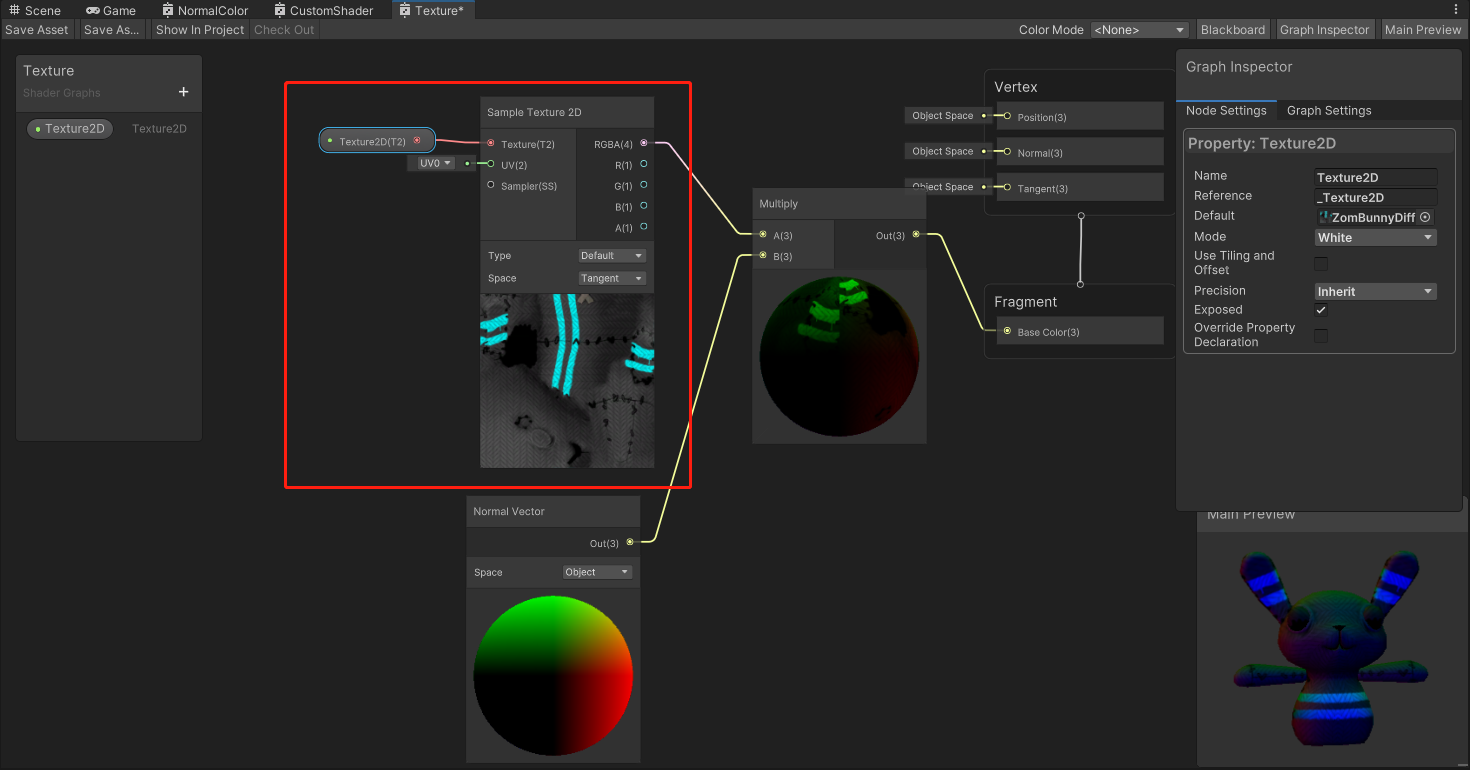
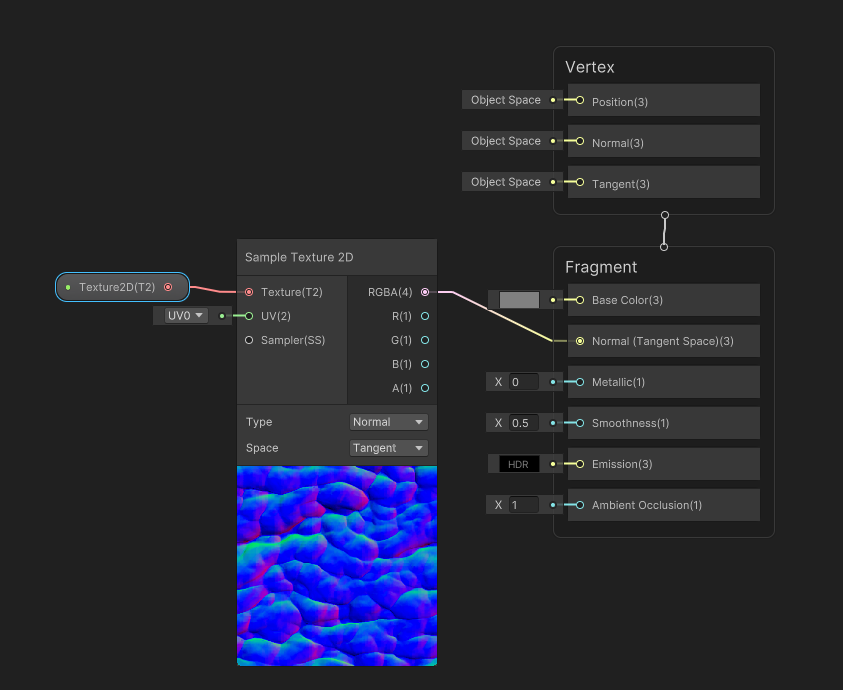
Texture - Sample Texture 2D
Lit shader Basics
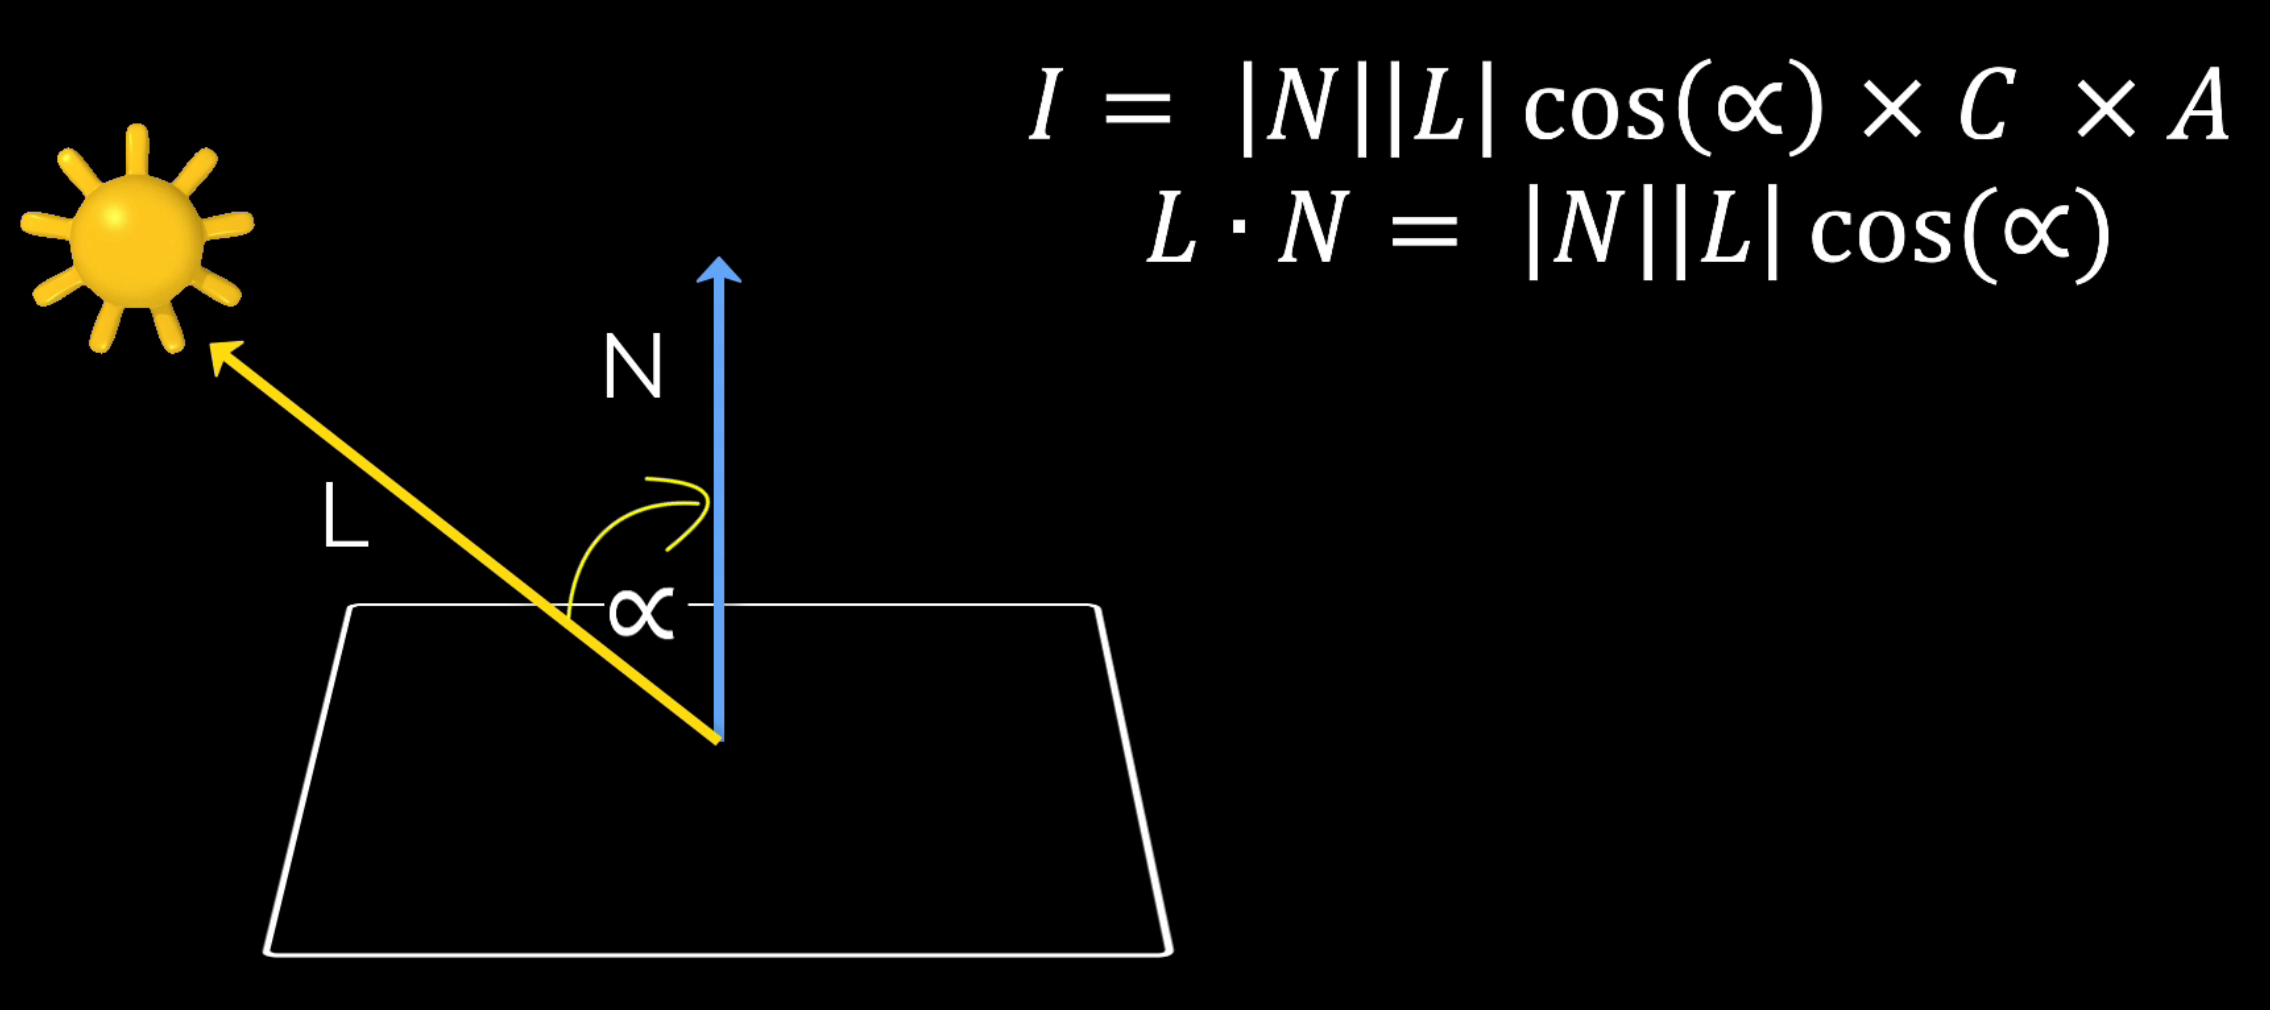
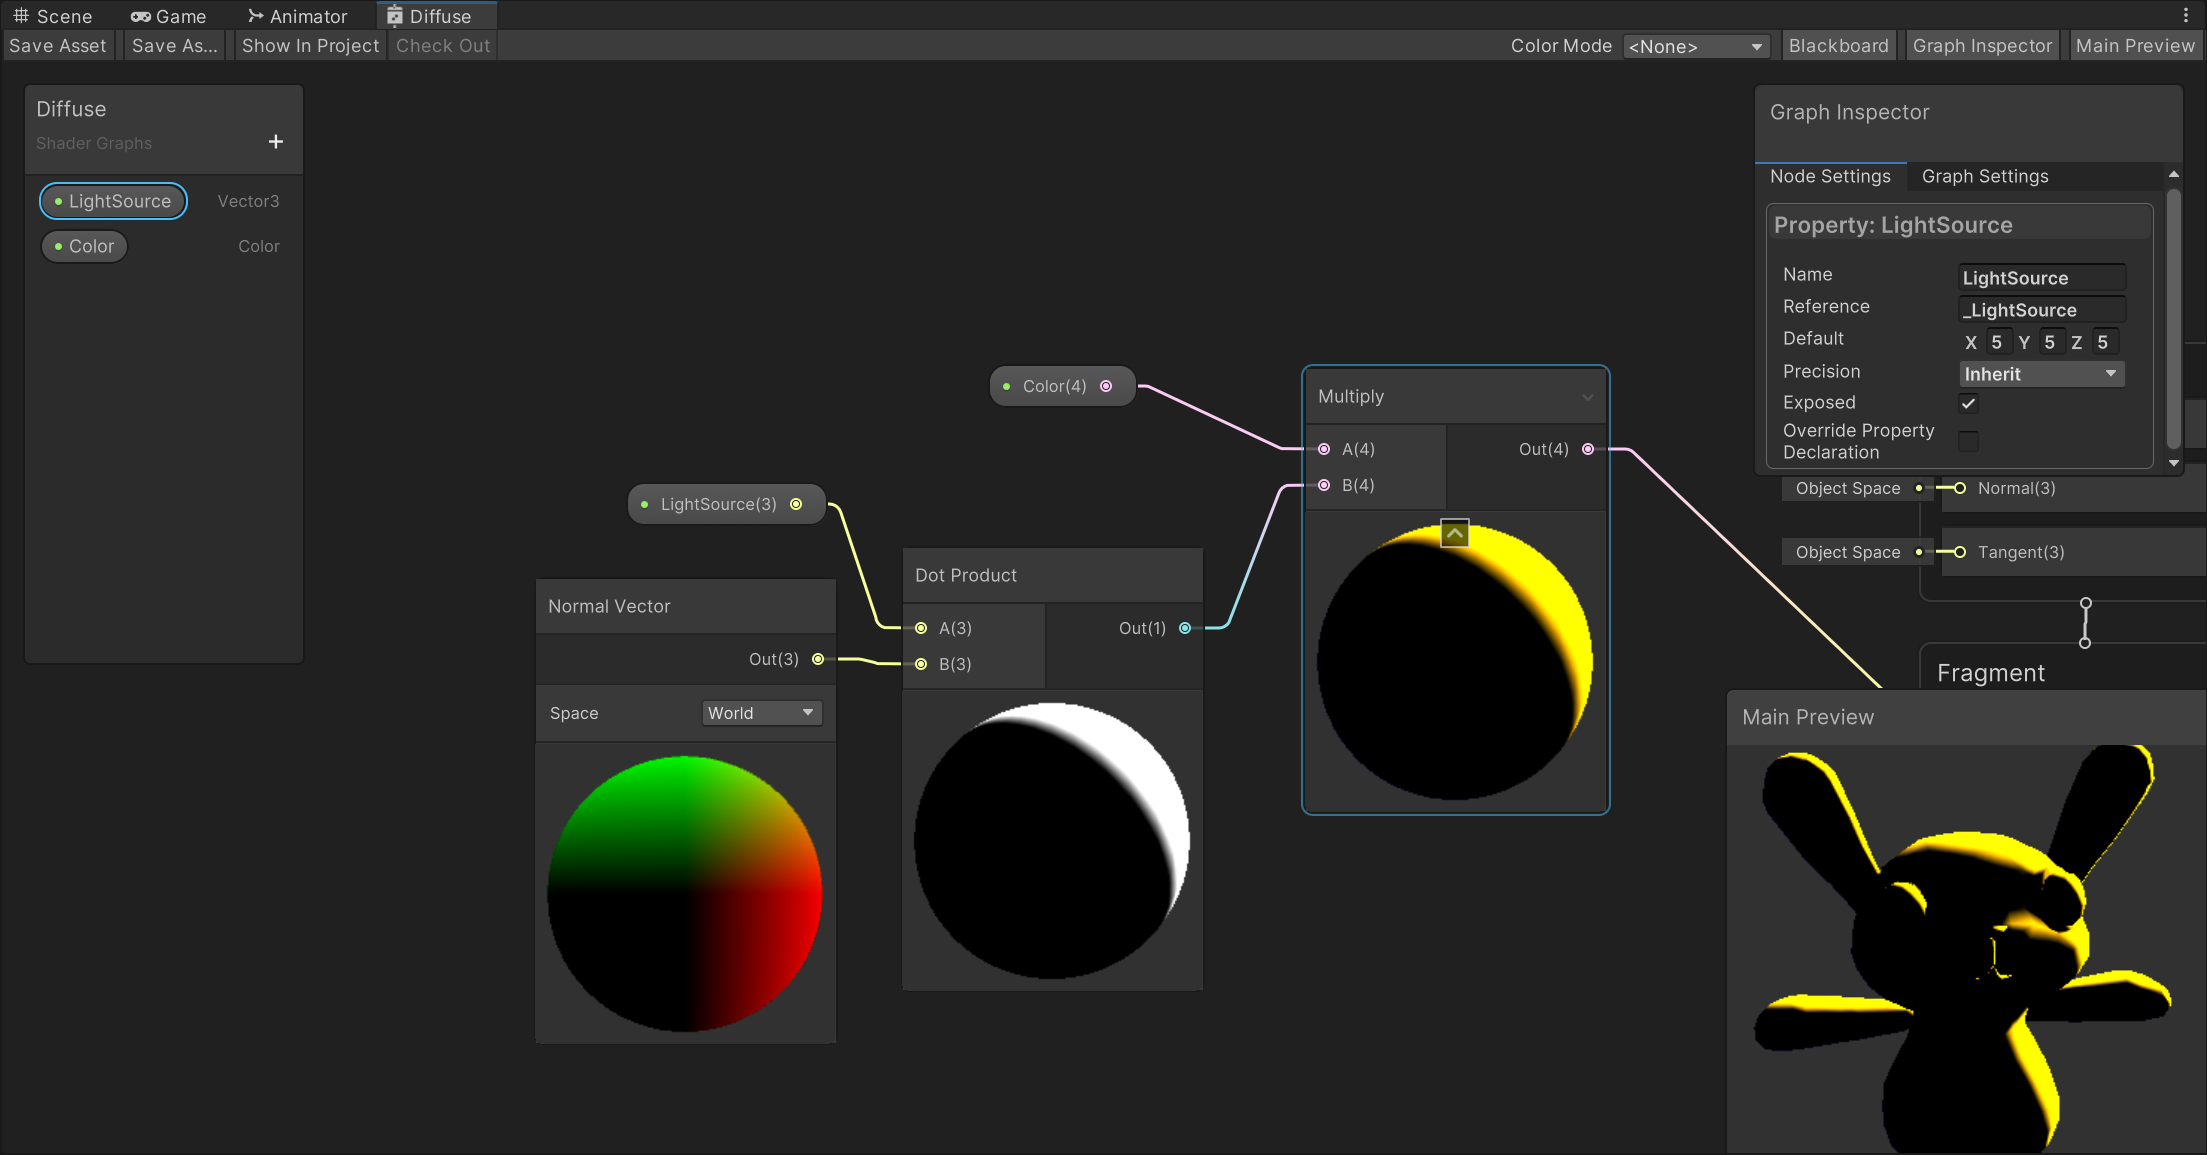
Lambert Light Model
- simple and fast
- not good at generating reflections and highlights
Lambert is a lighting model that defines the relationship between the brightness of a surface and its orientation to the light source.
When the angle between the light source and normal is small, the face get brighter. -> get intensity
- C: Color of the light
- A: attenuation (Strength of the light)
- ambient: background light in an environment that doesn’t emanate from anywhere.
- diffuse(simplest): illuminates the geometry of an object, giving it depth and volume
- Specular: bounces off a surface and can be used to create shiny patches.
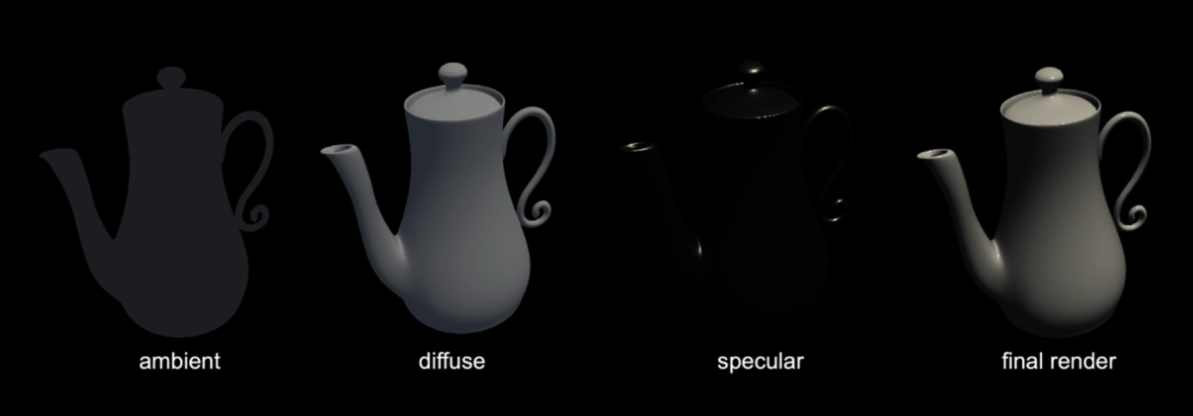
[Diffuse] being lit apparently from a light source that’s at (5,5,5) in the world.
Lighting Models
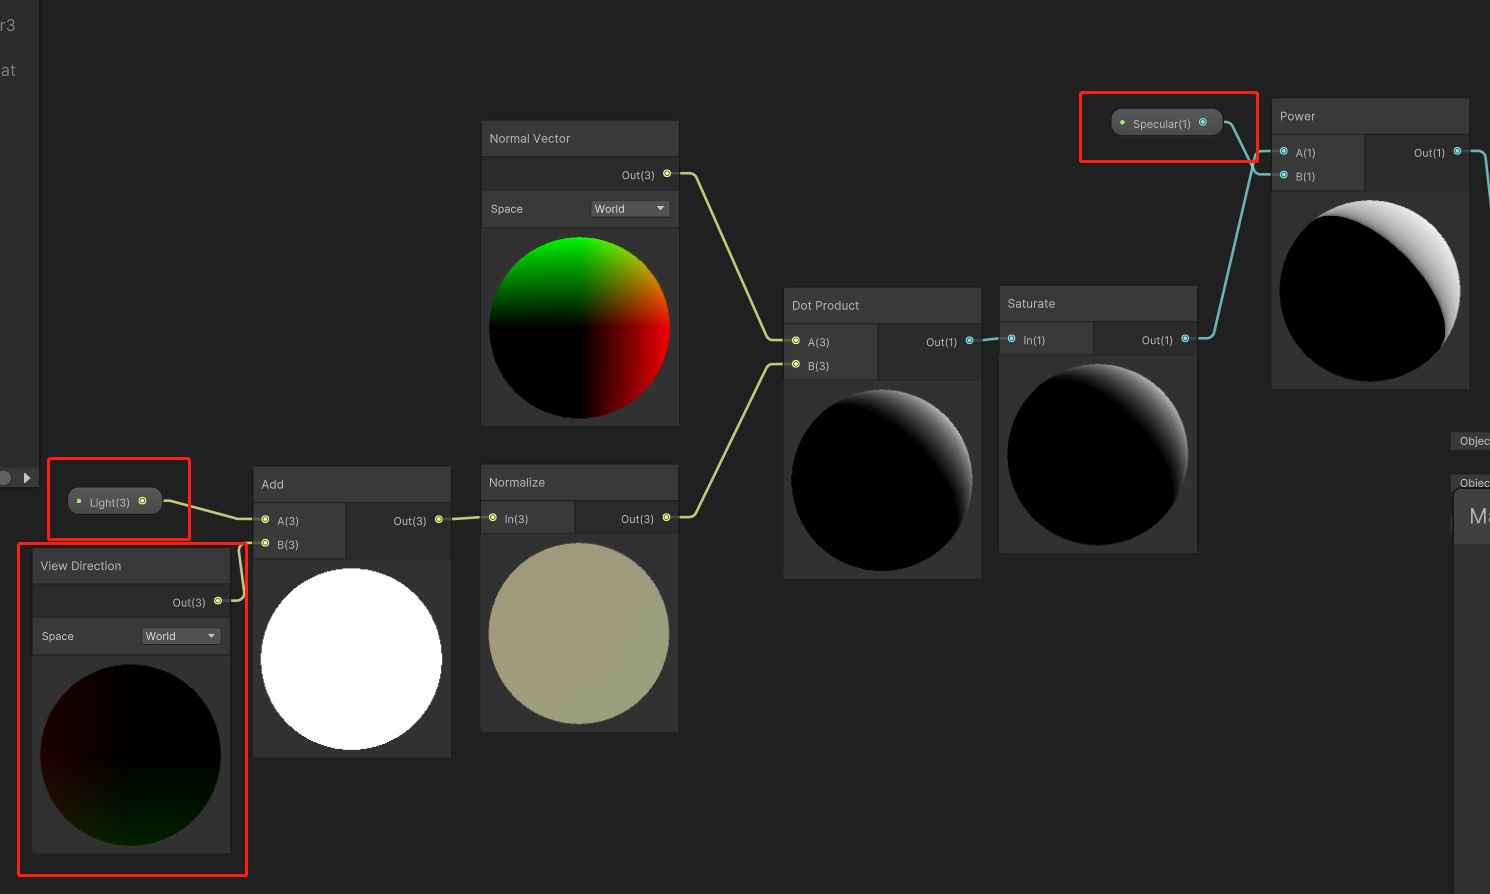
Specular Reflection / Lambert & Blinn-Phong
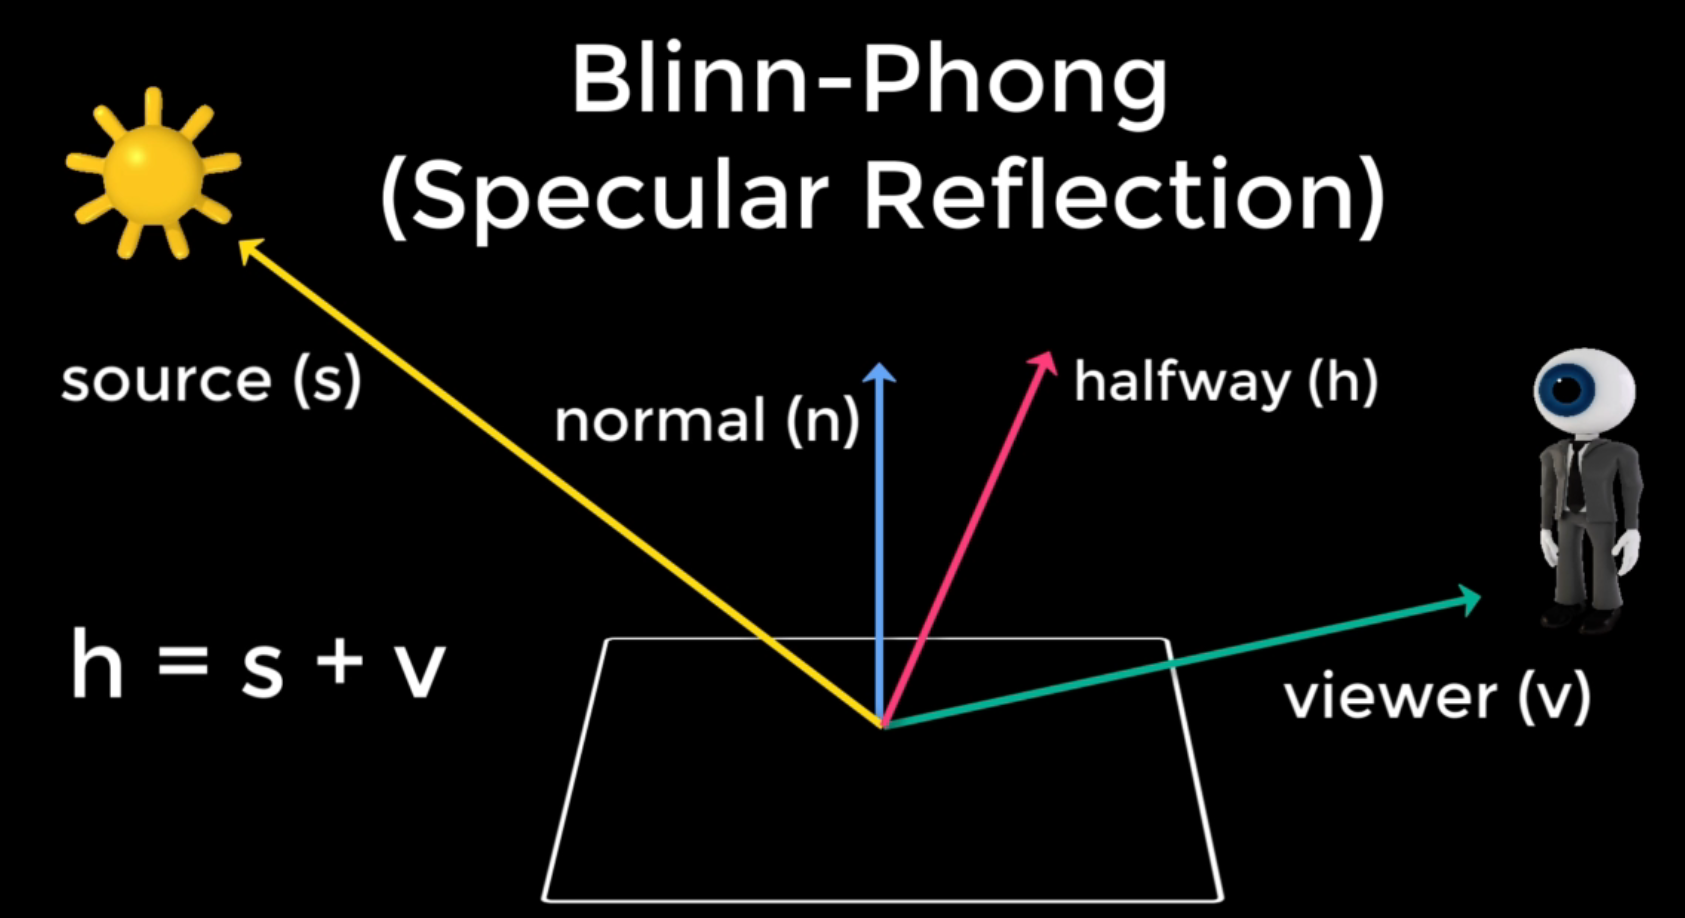
The angle between the normal and the half way is then used to work out the intensity. -> efficient
[Specular]
Physically-Based Rendering
Built-in Lit shader
Reflection: reverse calculation to lighting
Diffusion: how color and light are distributed across the surface by considering what light is absorbed and what is reflected and how.
Translucency and Transparency
Conservation of Energy: a concept that ensures objects never reflect more light than they receive.
Metallicity: the interaction of light on shiny surfaces and the highlights and colors that are reflected.
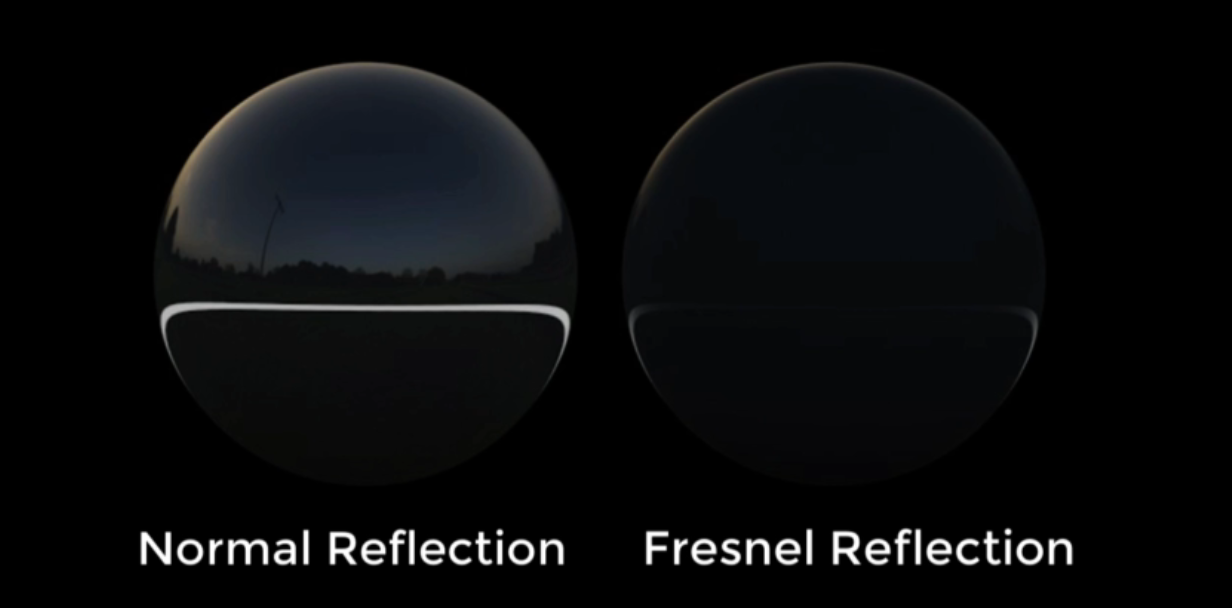
Fresnel Reflectivity: how reflections on a curved surface become stronger towards the edges.
Microsurface Scattering
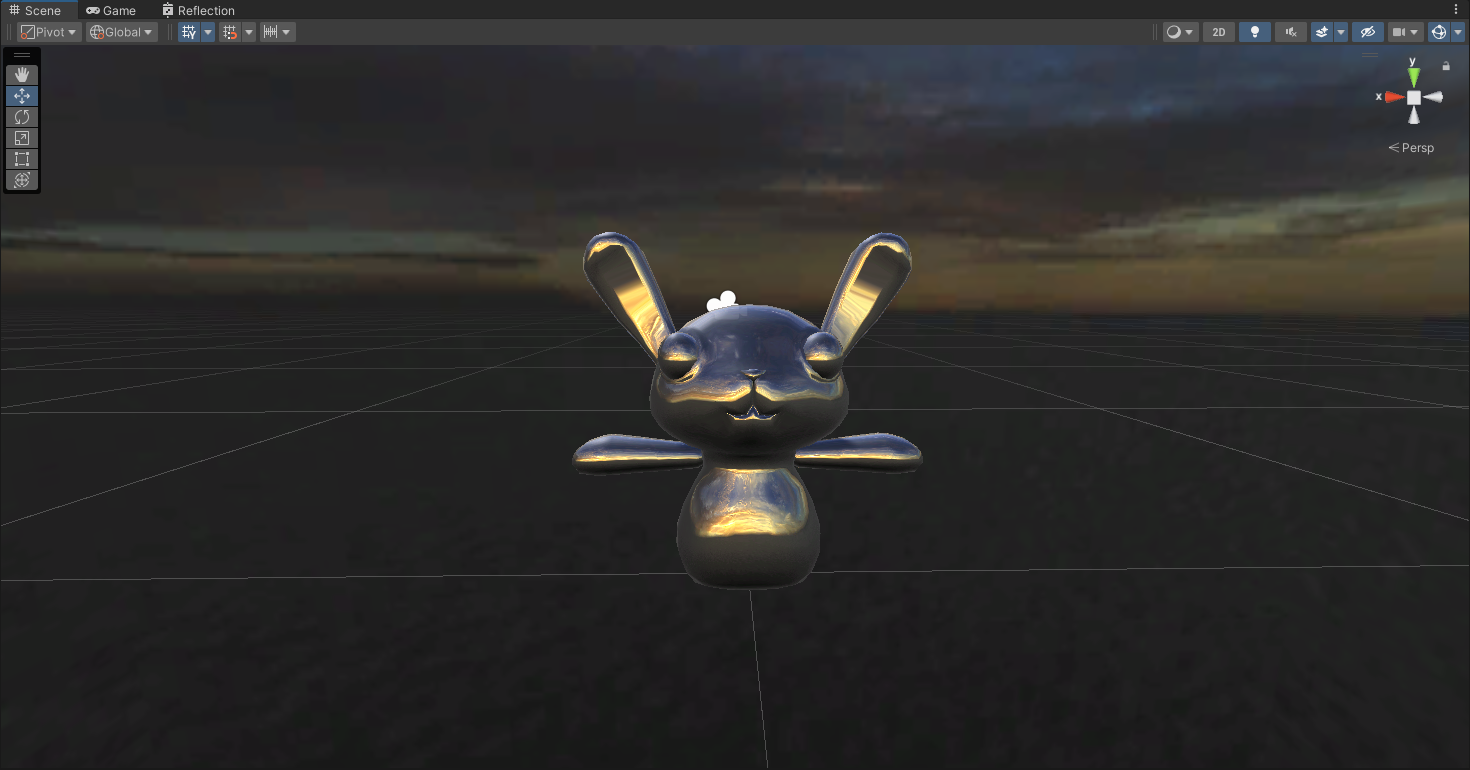
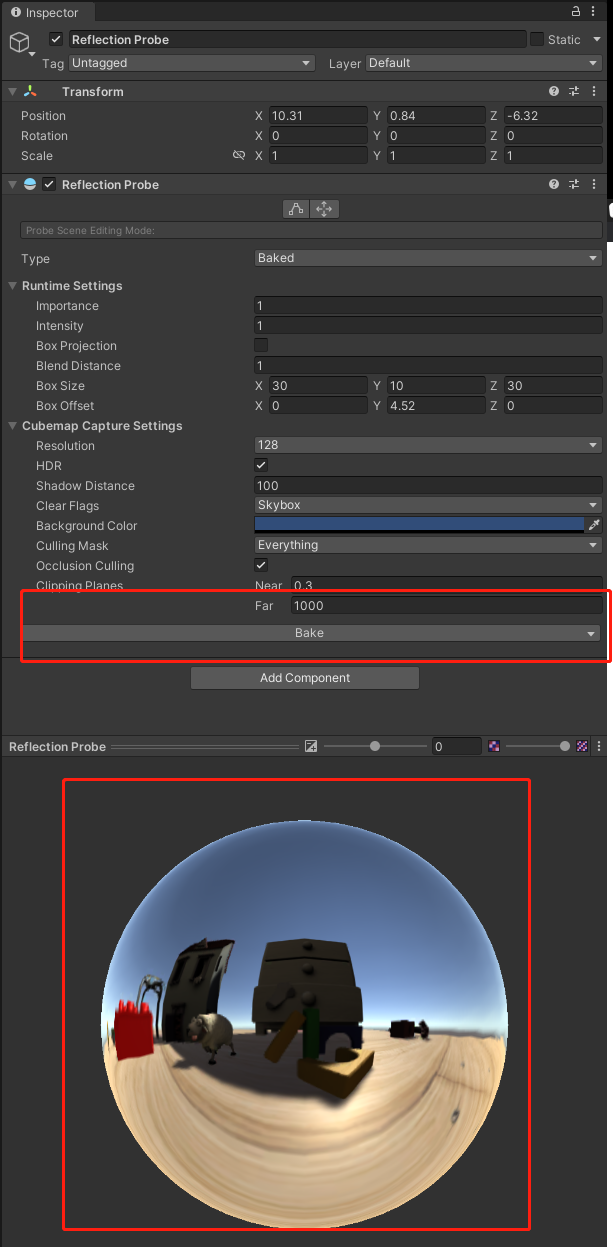
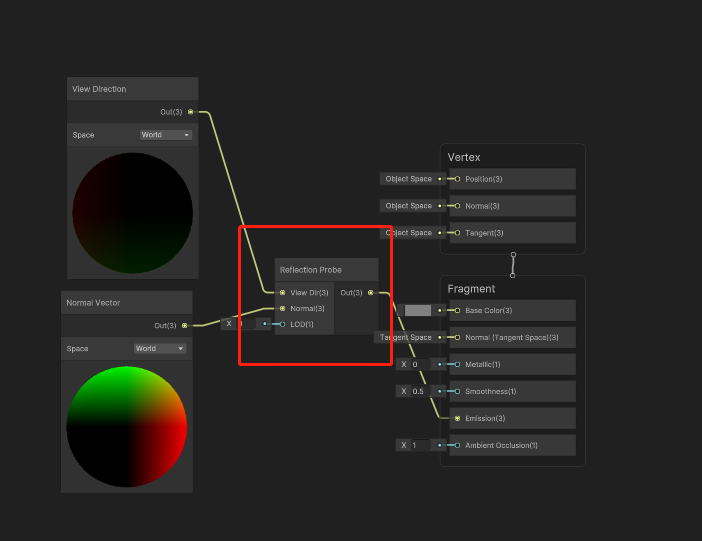
Reflection
reflect skybox - cubemap
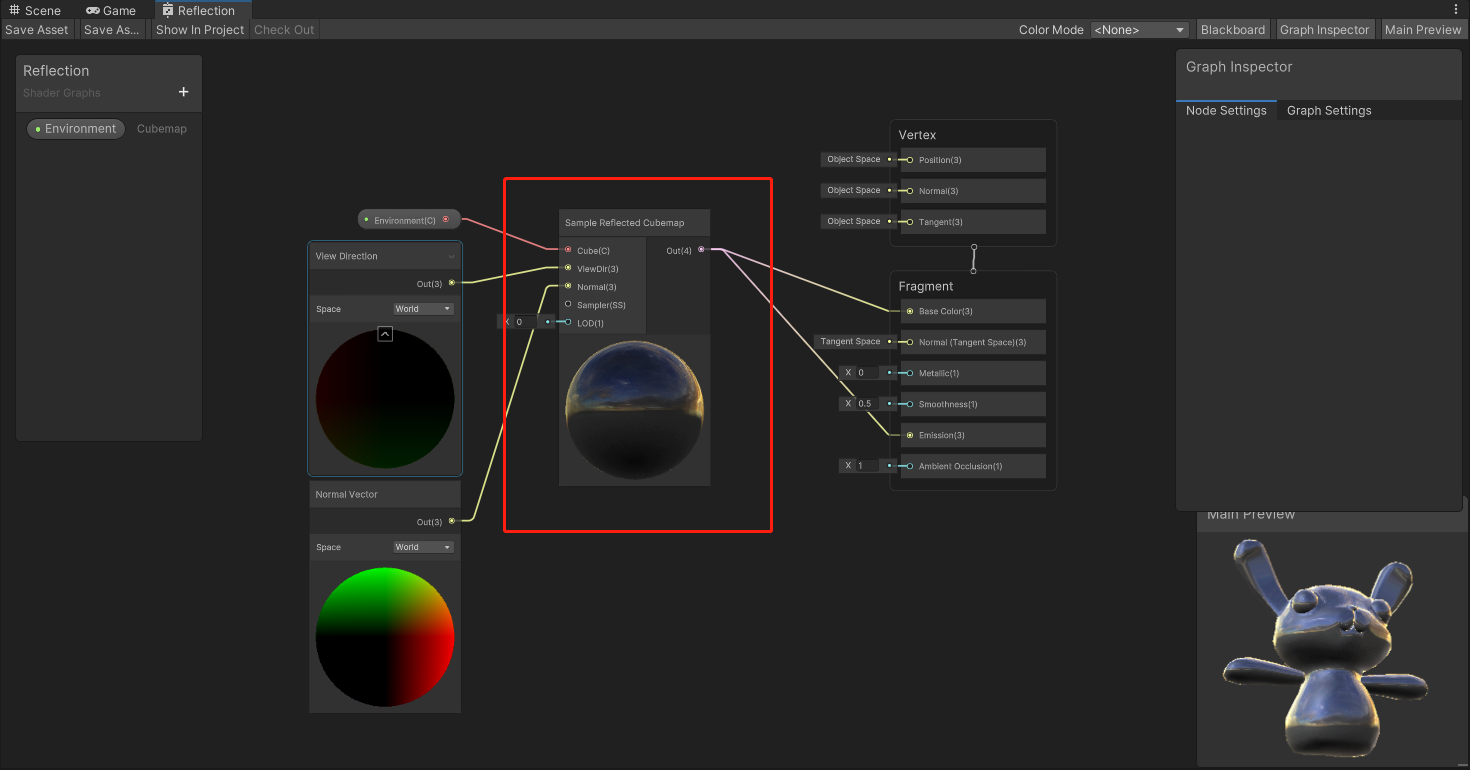
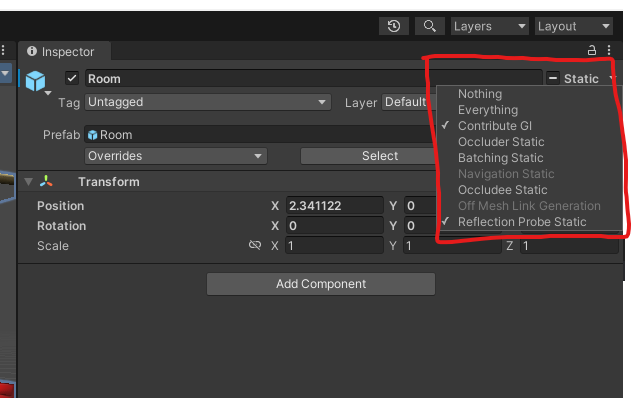
reflect object - Reflection Probe
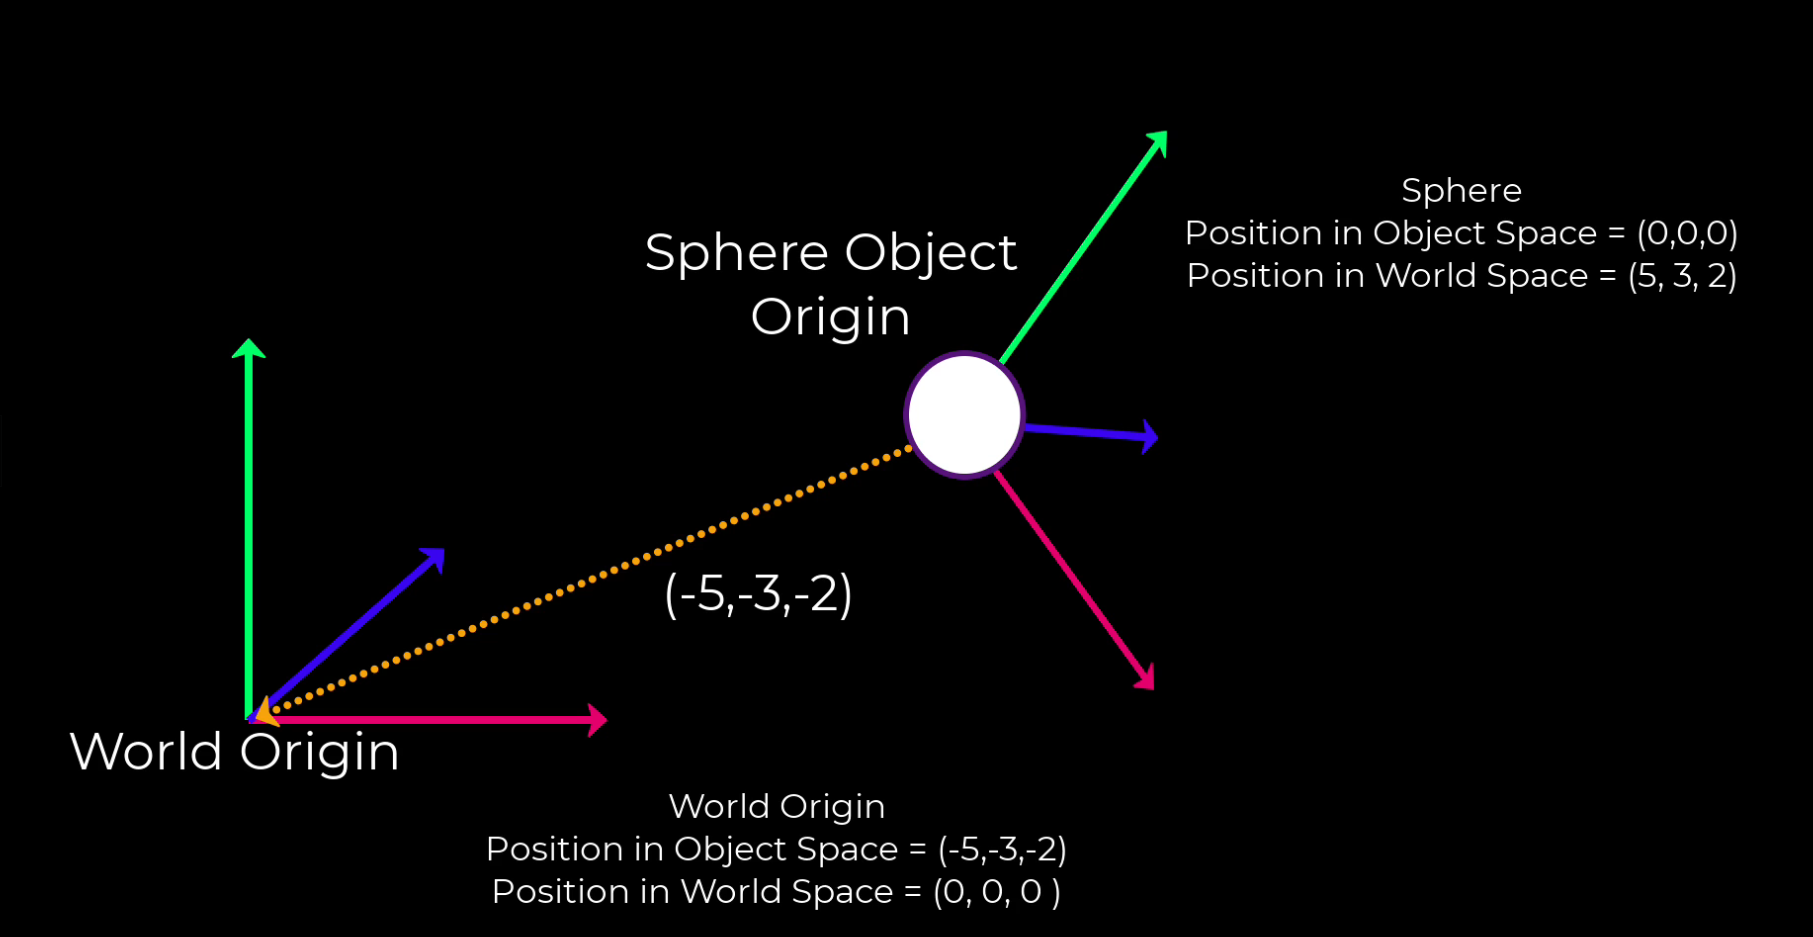
Coordinate Spaces
- object space
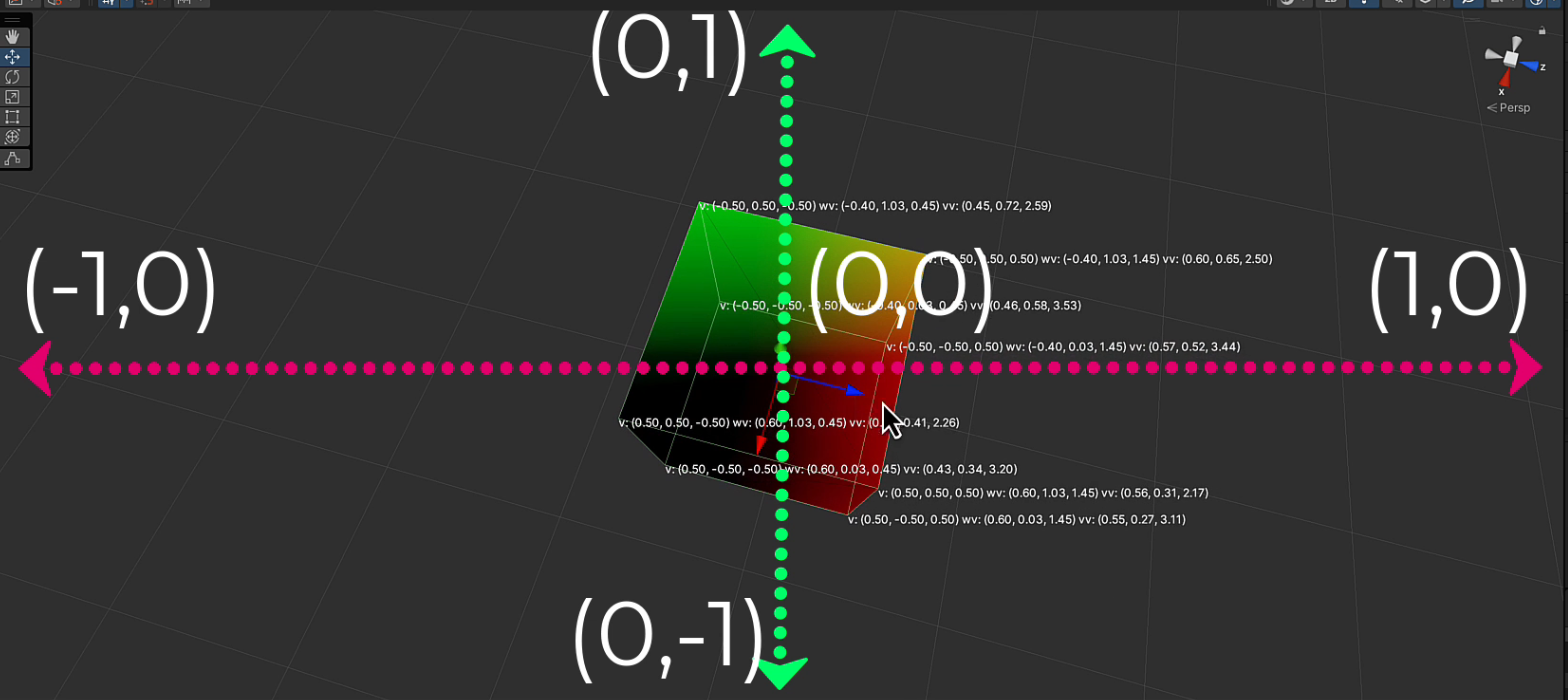
- world space
- view space
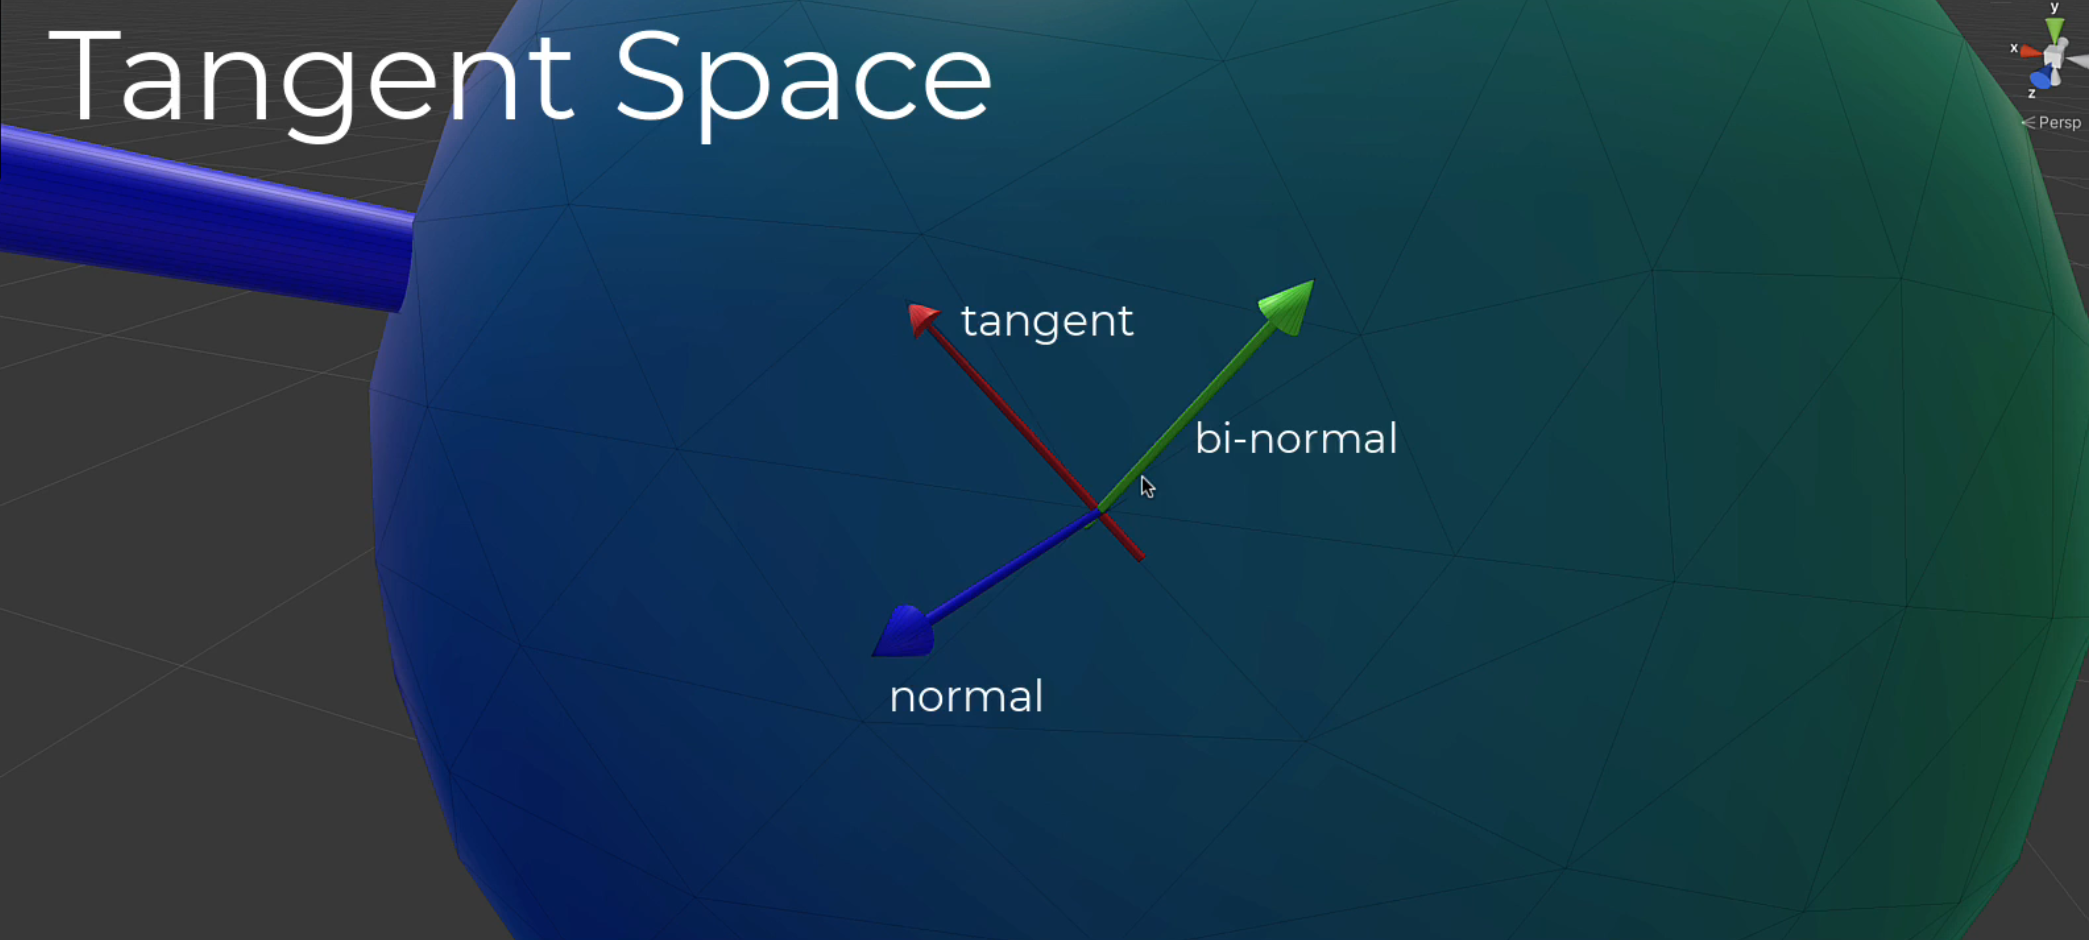
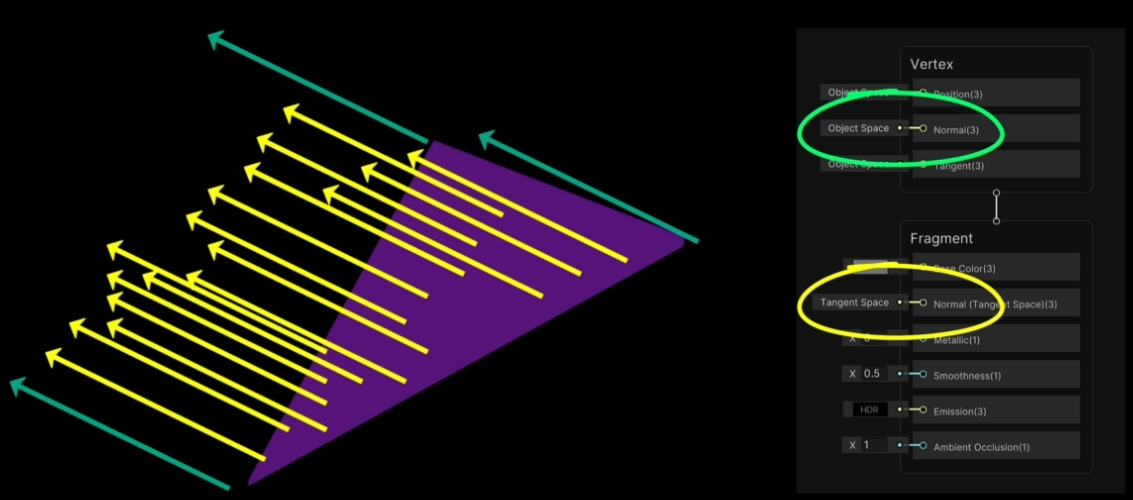
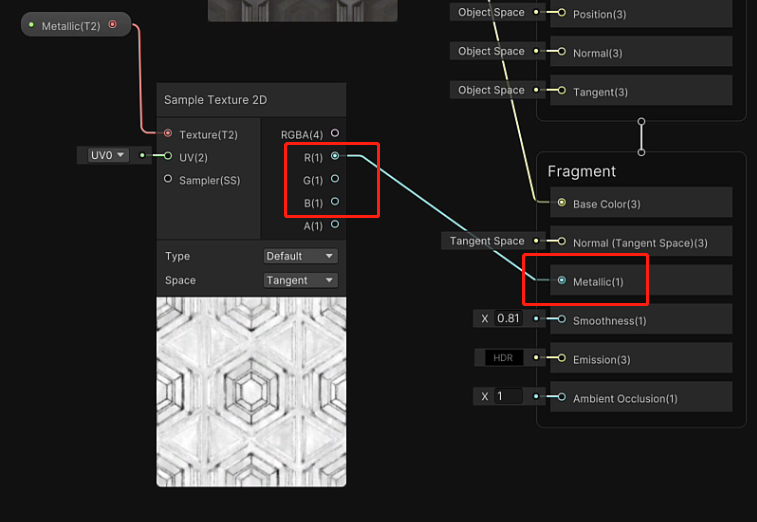
- tangent space (each vertex has a tangent space)
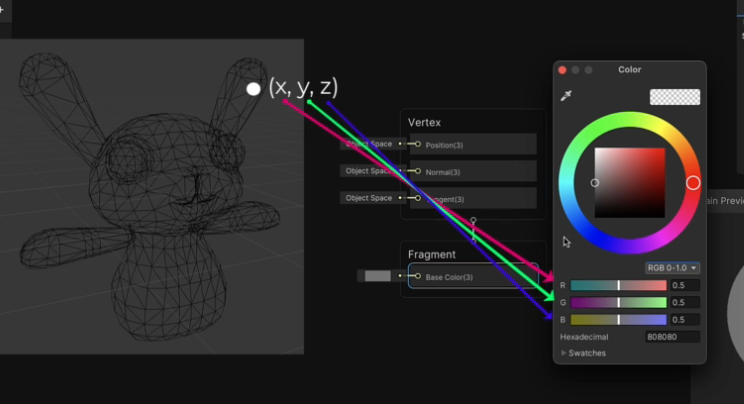
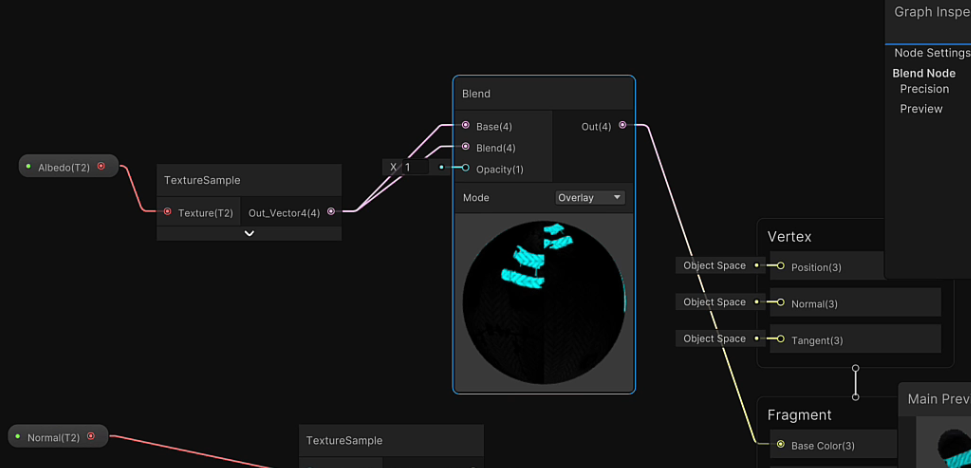
- position(object space) -> Base Color

Object Space
Time
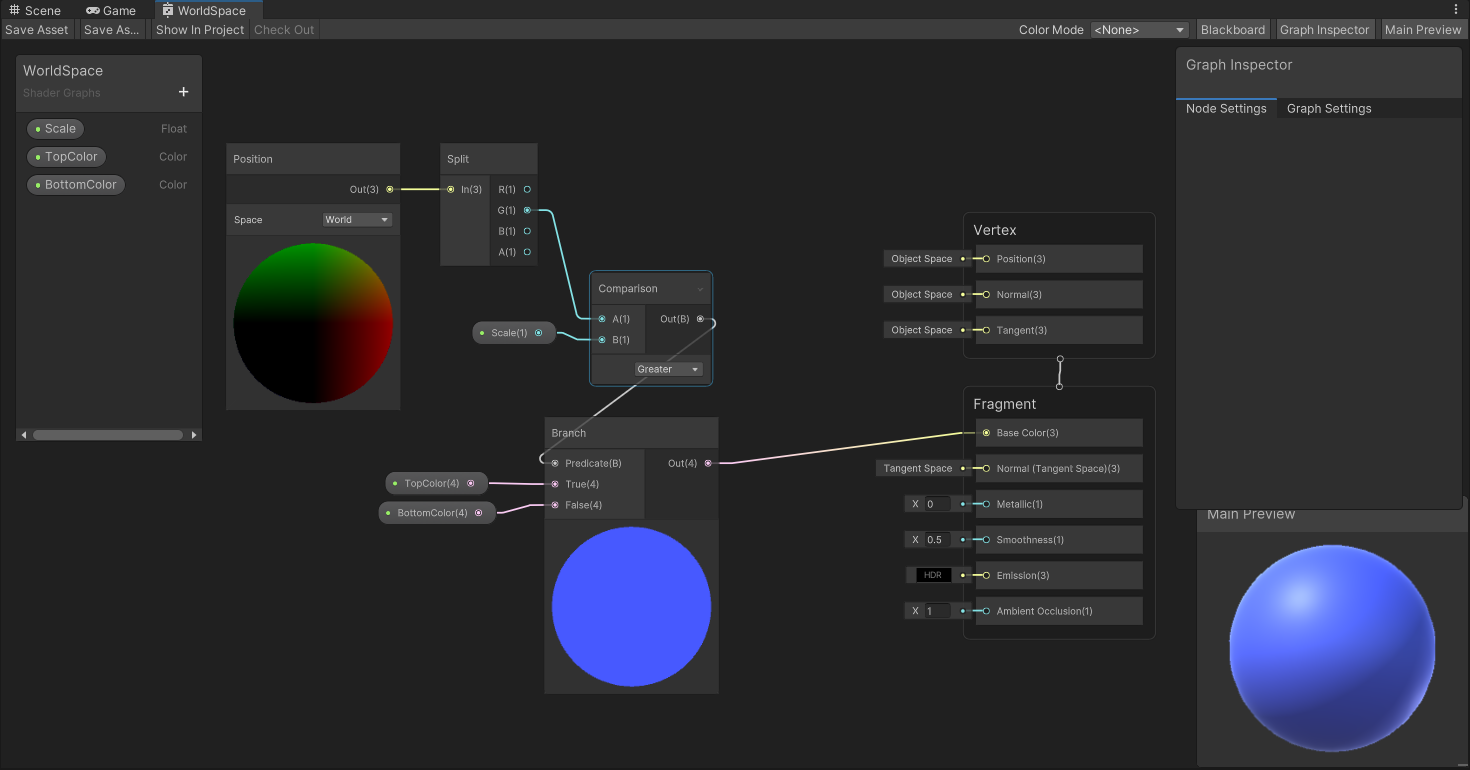
World Space
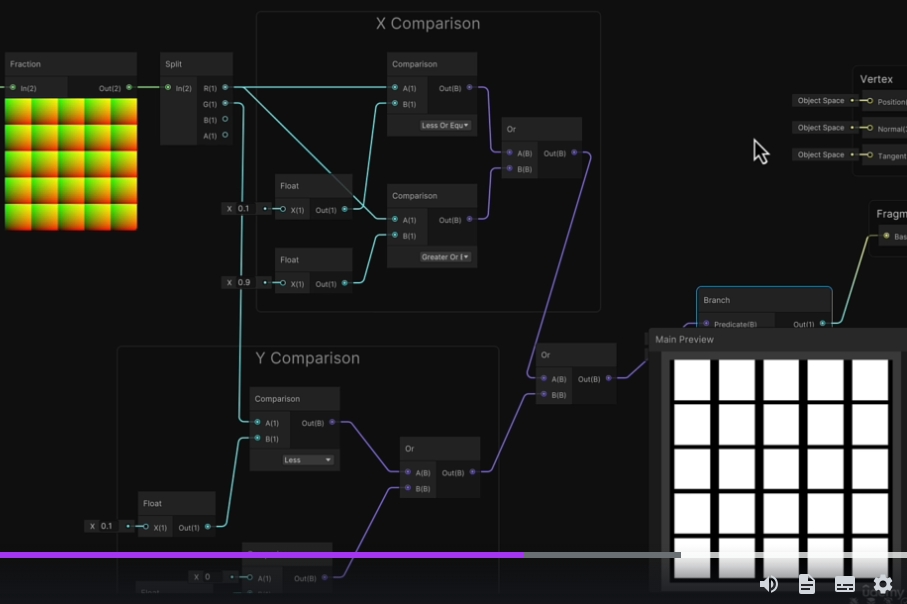
- split
- Comparison
- Branch
View Space
Tangent Space (Texture Space)
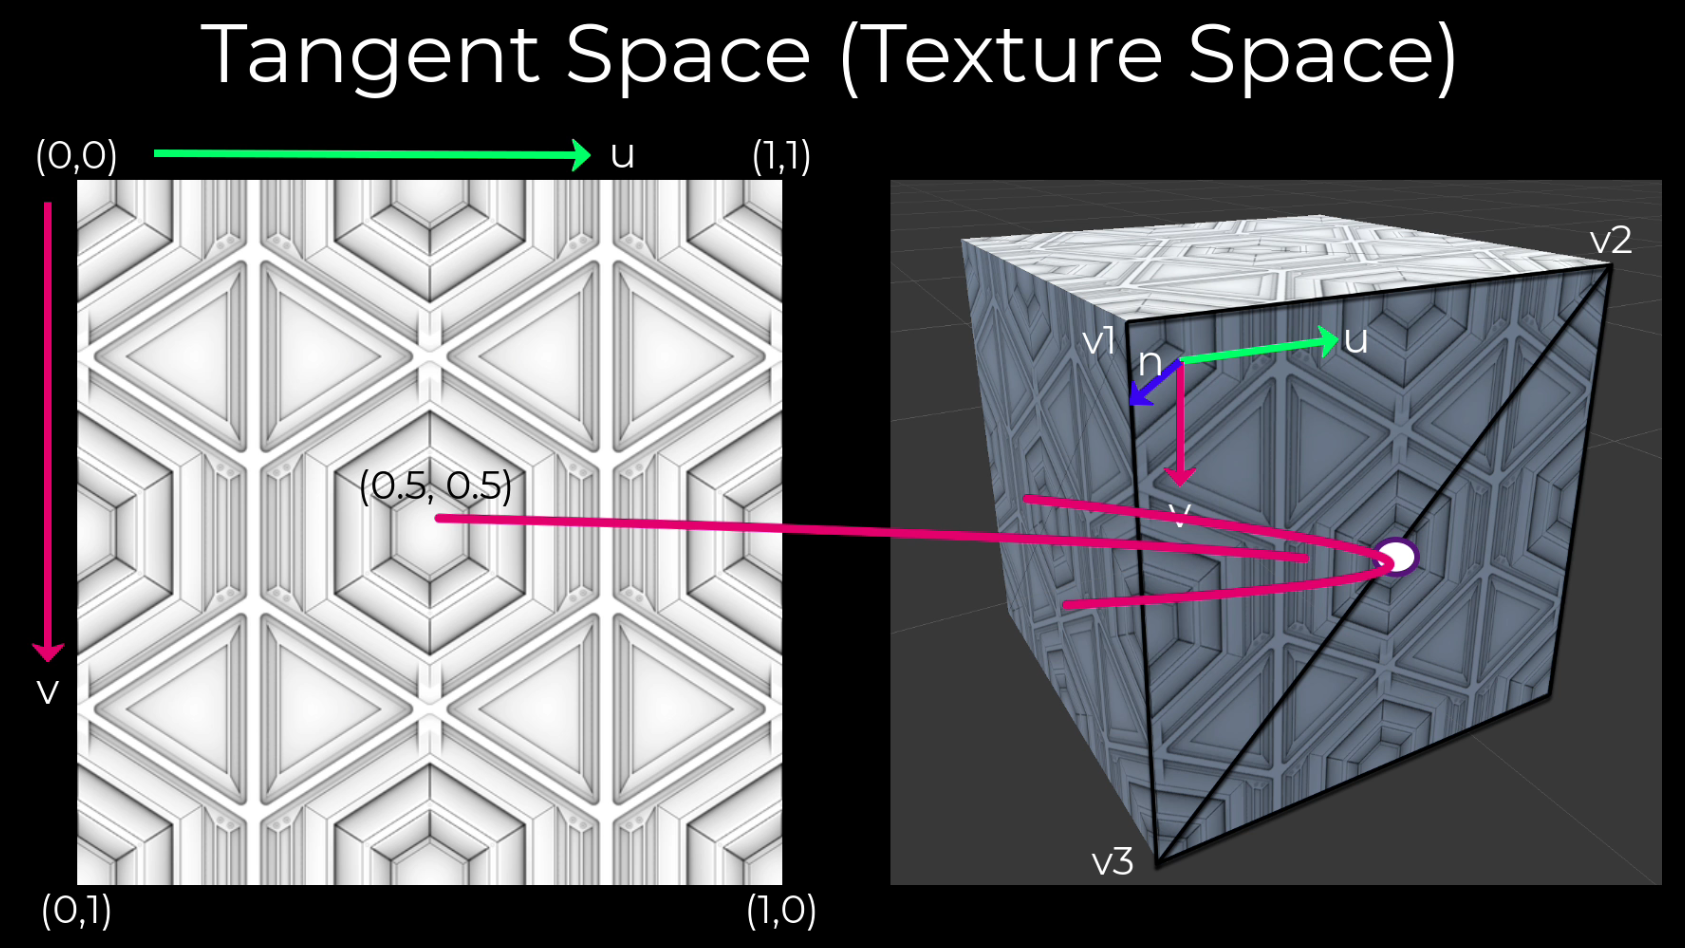
normal -> z axis in object space.
- To calculate between Camera and Light, turn Camera and Light to Object Space. Instead of object, because an model and have a lot of nomal
- tangent space is on the next level down and it comes into its own when we start using special images to define the surface textures with respect to lighting on the surface of each plane, of the mesh in a technique that we call tangent space normal mapping.
- Fake light effect on texture without changing any vertex
- calculate the light effects based on the normal specified at each pixel as per the image that you’re using.
- faking it by putting a whole bunch of new normals across an entire surface using the normal image
Unity’s Render Pipeline
- HDRP
- targets high end hardware and desktop PCs and consoles.
- Ray-tracing
- not for 2D game and mobile game
- Bend Normal(new node): part of ambient occlusion calculations <- SD
- URP
- better performance
- 2D shaders
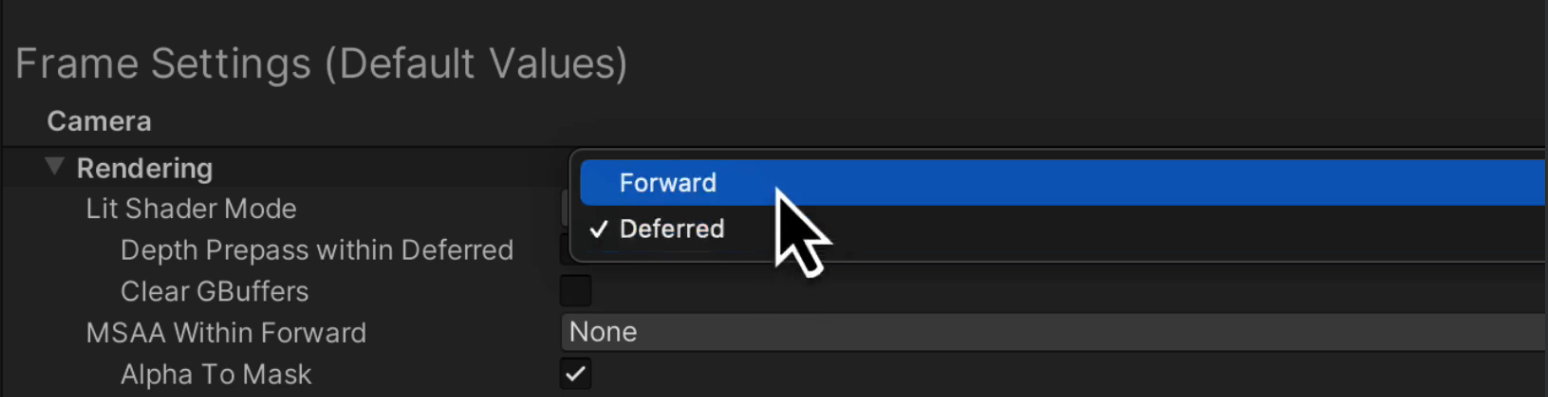
Unity Rendering Pipeline Difference
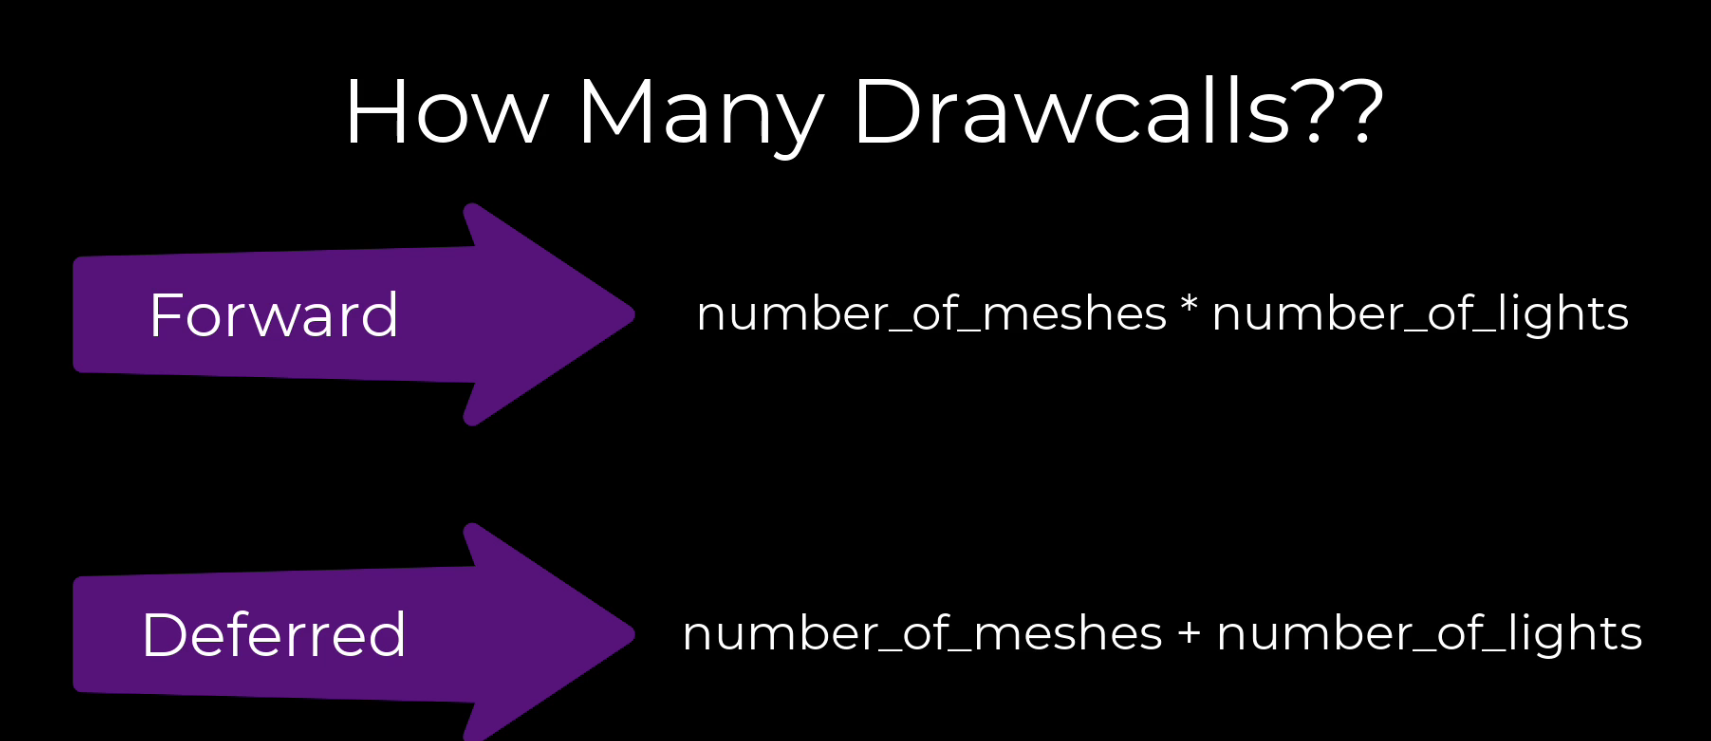
Forward and Deferred rendering
Vertex -> Geometry (forward / deferred) -> Fragment


Drawcalls
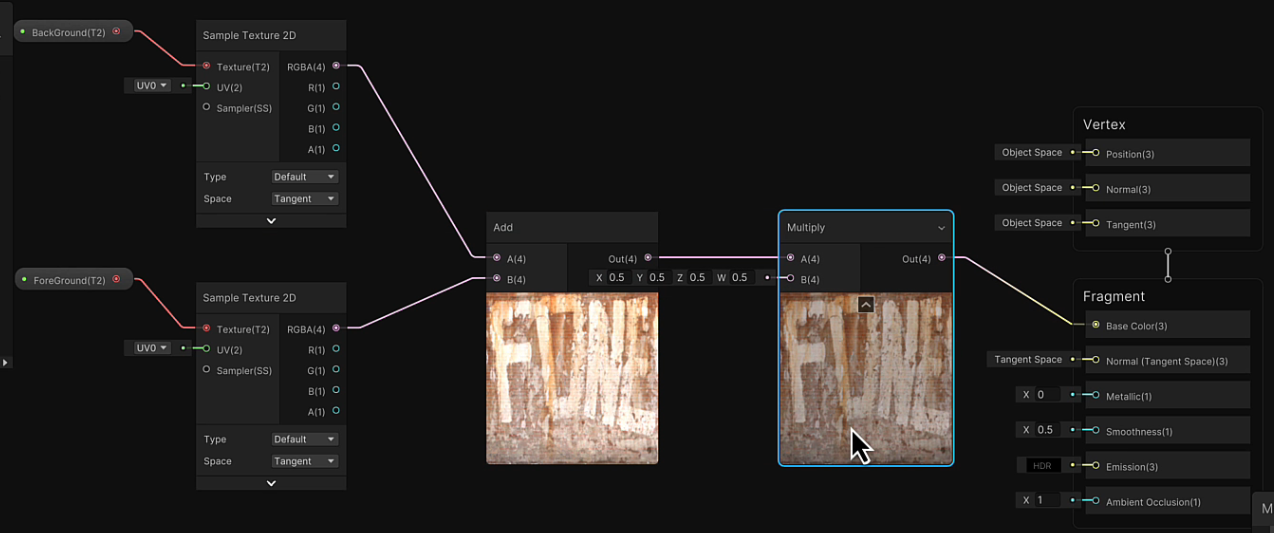
Blending
Basics
Average: taking pixel values and mathematically add them up, then get average
(Target + Blend) / 2
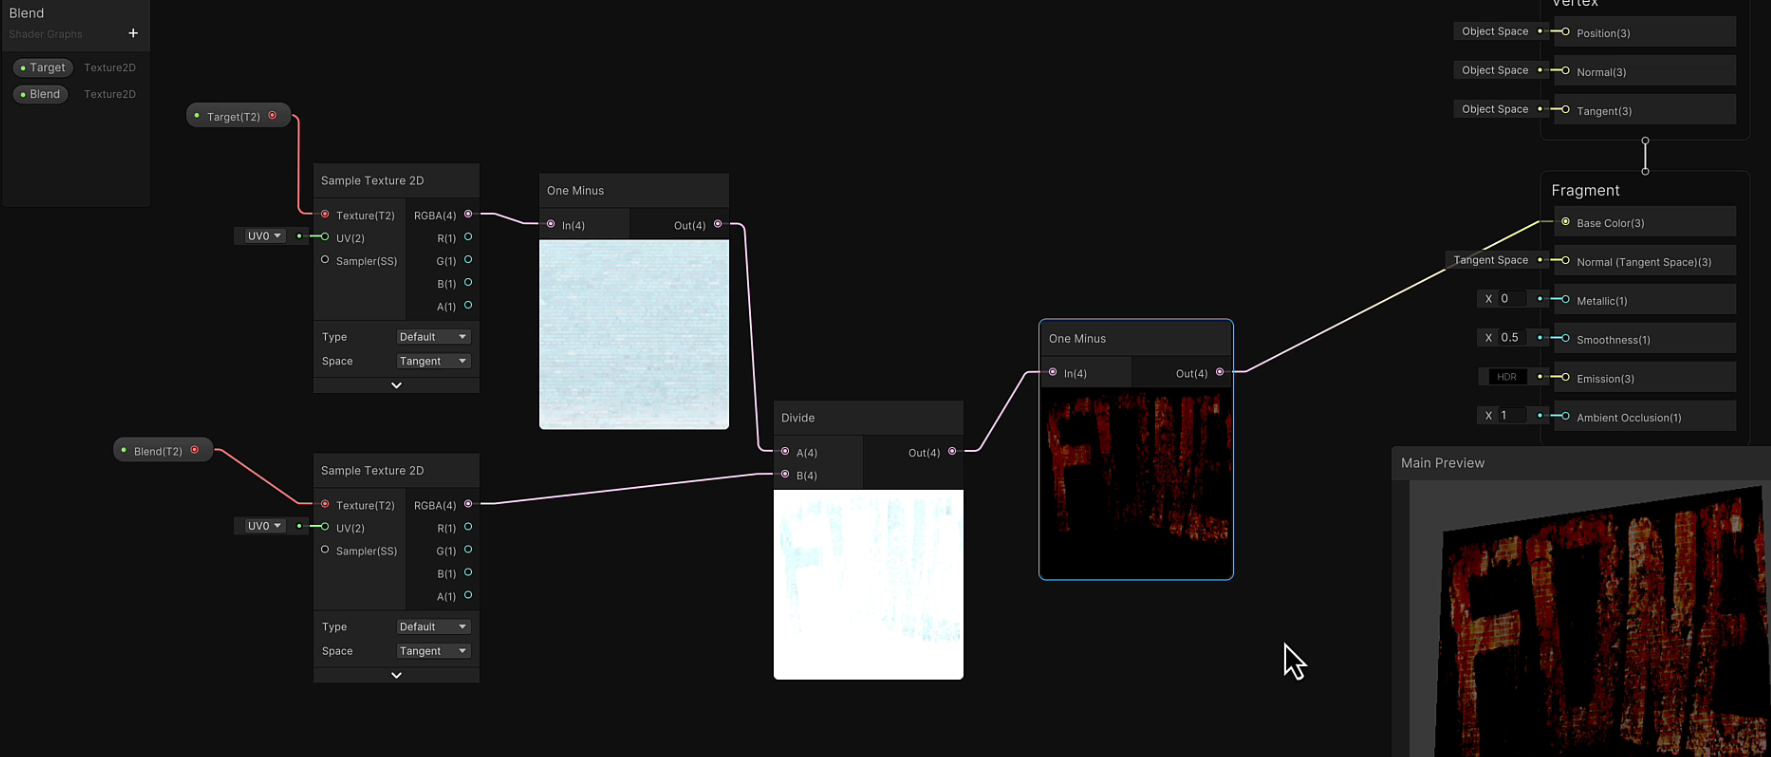
Linear & Color Burn
Linear Burn: Target + Blend - 1
Color Burn: 1-(1-target) / Blend
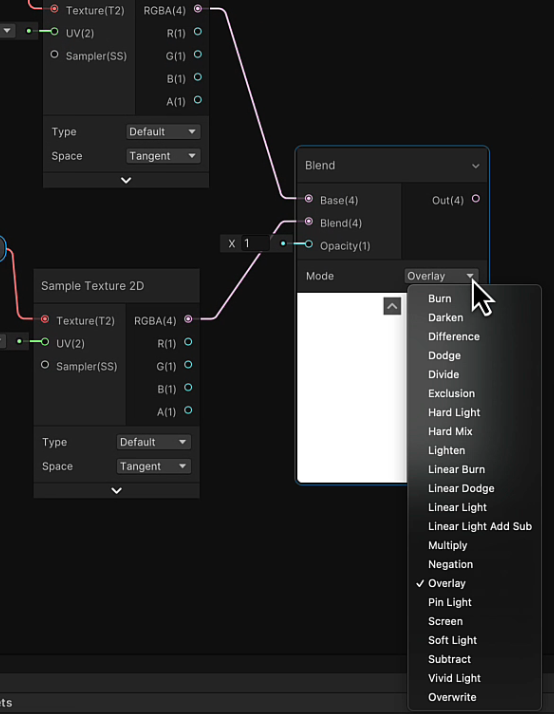
More blending nodes
Darkening Blend
- Darken: min(Target, Blend) -> emphasize the dark in the blend image. White will be ignored
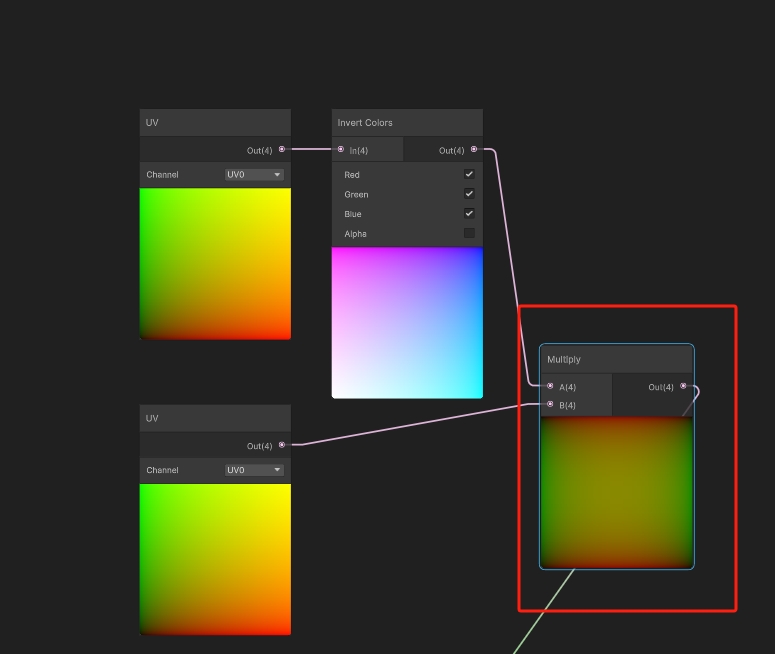
- Multiply: Target * Blend
- Linear Burn
Lightening Blend
- Lighten: max(Target,Blend), opposite to the Darken
- Screen: 1-(1-Target)*(1-Blend), blend two color
- Dodge: target/(1- Blend)
- Linear Dodge: Target + Blend
Contrasting Blend
- Overlay (Dark getting darker): most usually for blending two colors
- Soft Light
- Linear Light
- Vivid Light
- Hard Light
- Pin Light
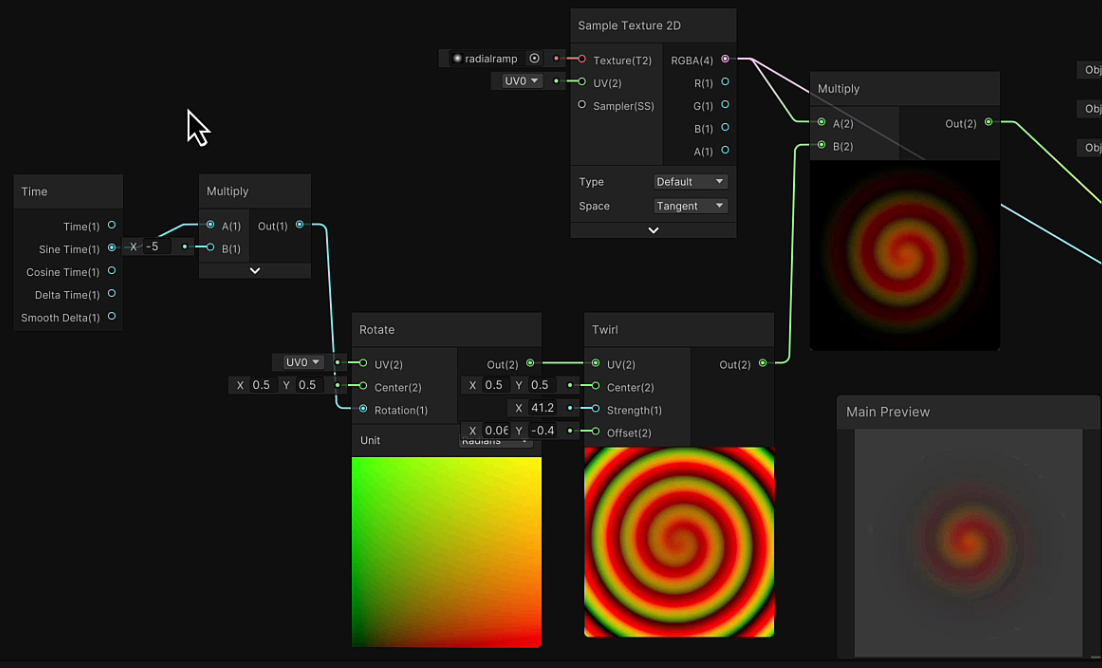
Time
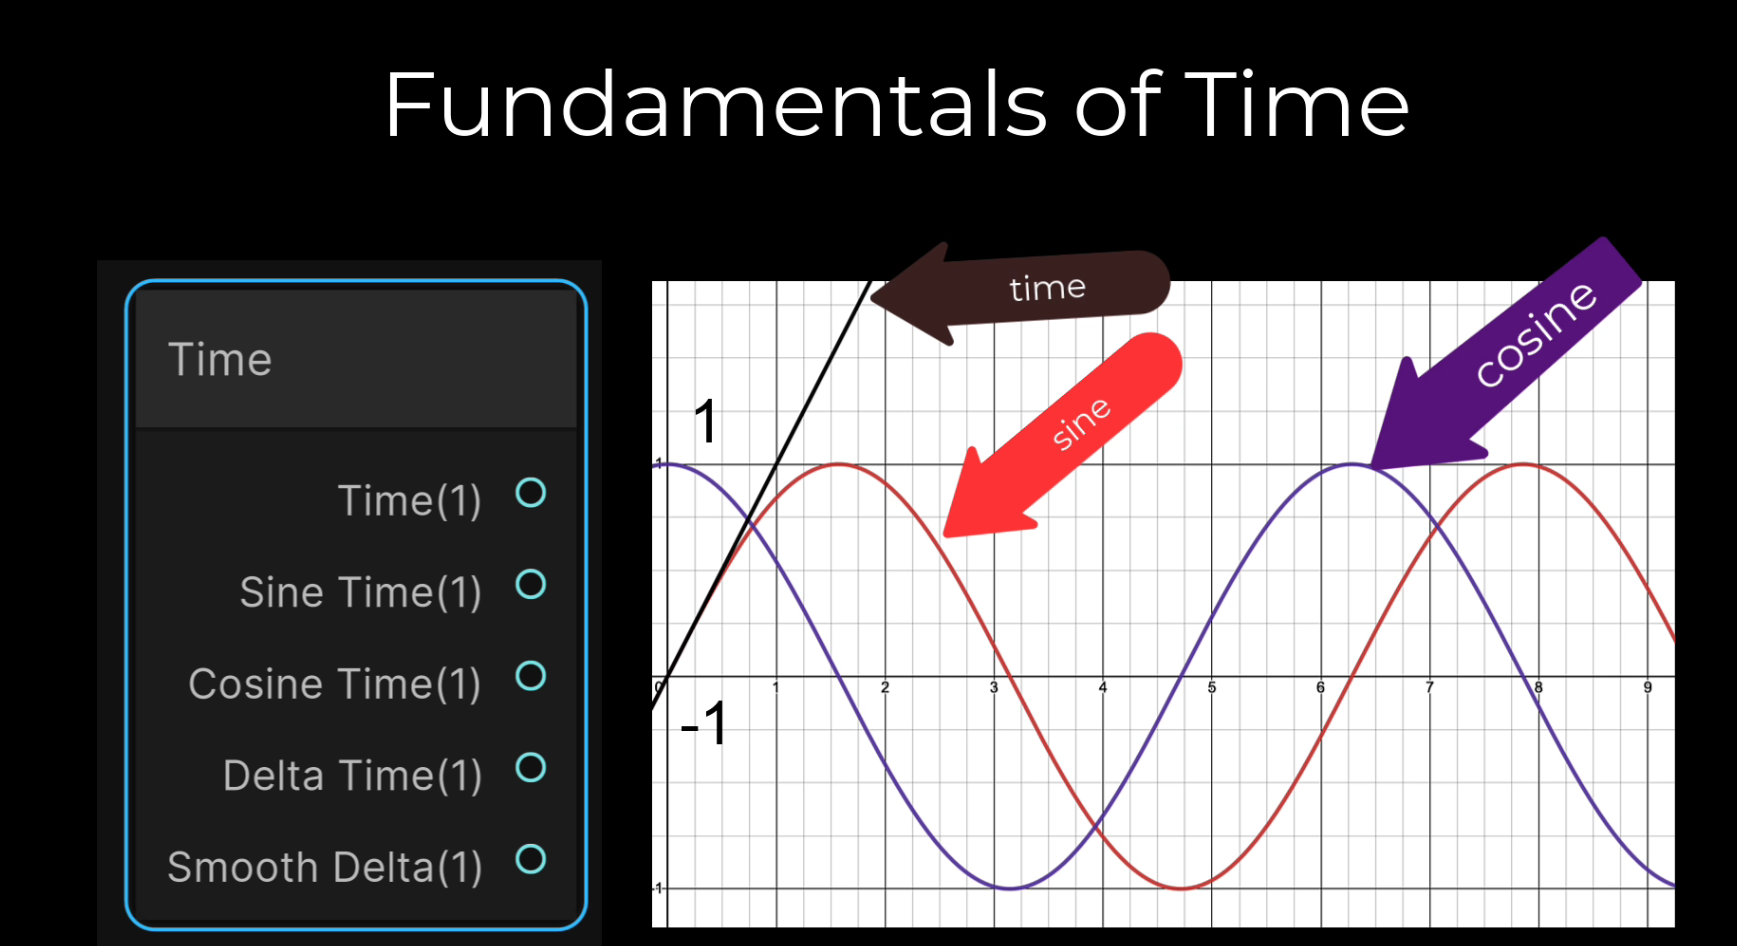
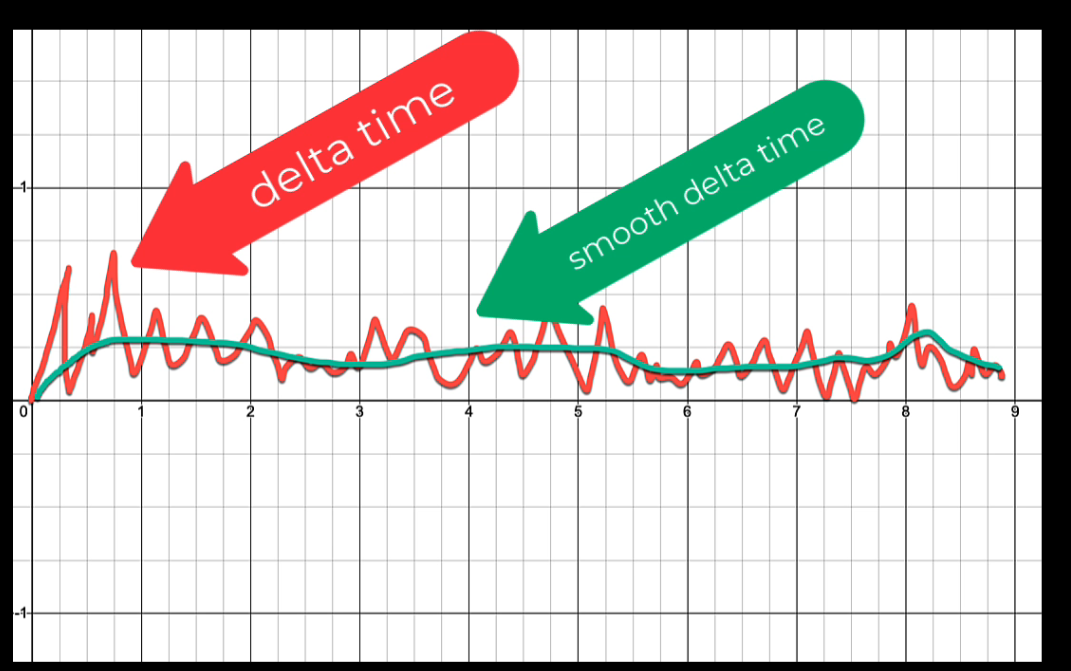
- delta time is the time and seconds since the last frame was rendered. -> used for object in moving with update()
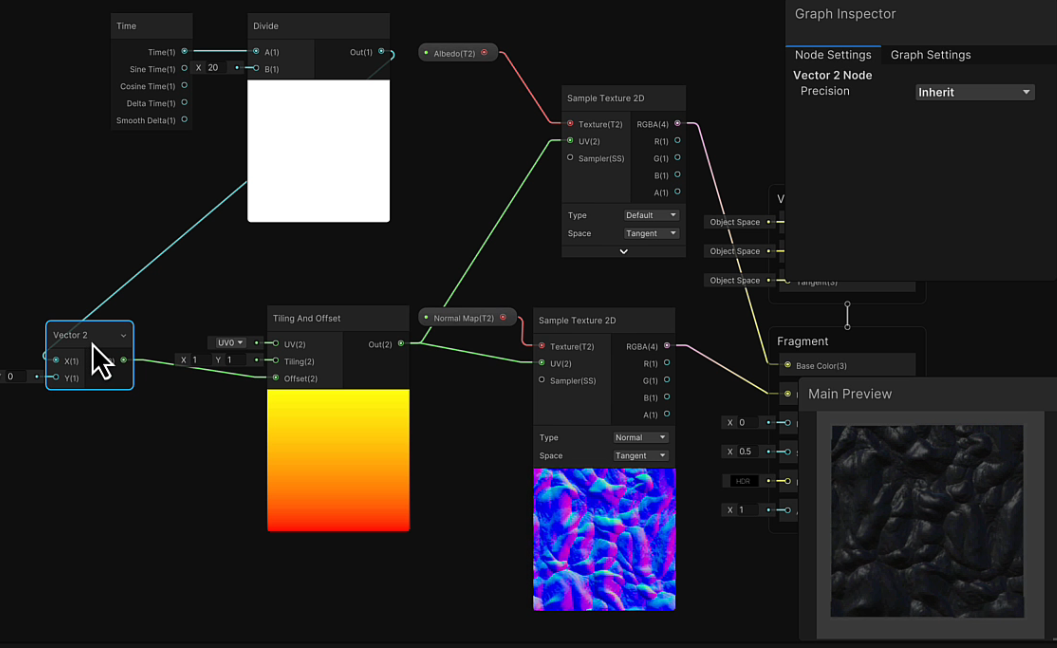
Scroll
Portal effect
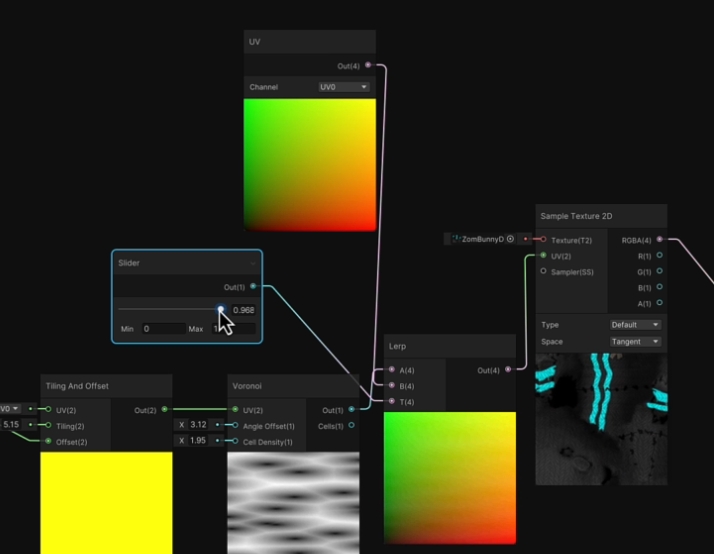
Lerp
For blending one state with another -> two image or two color
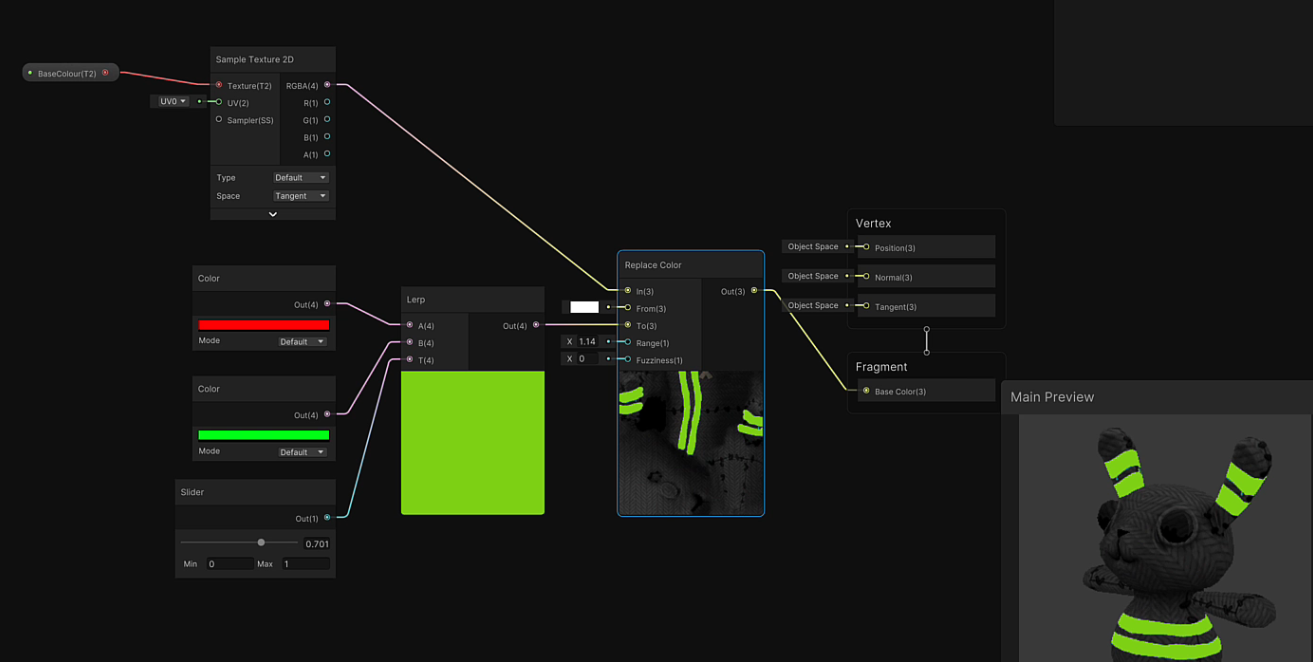
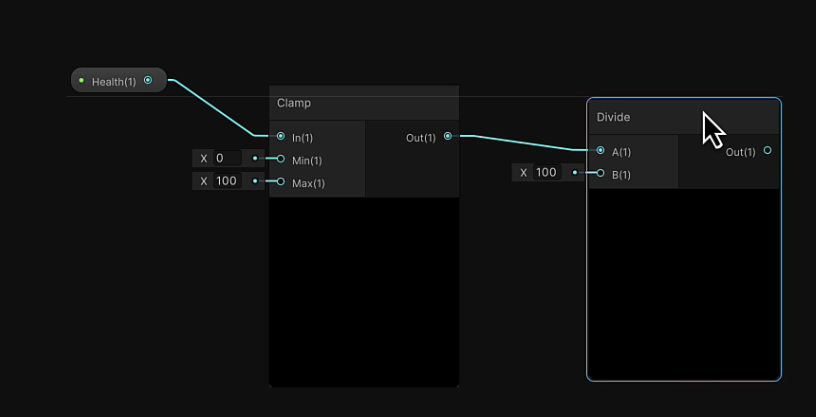
Node
- Replace Color
- Clamp
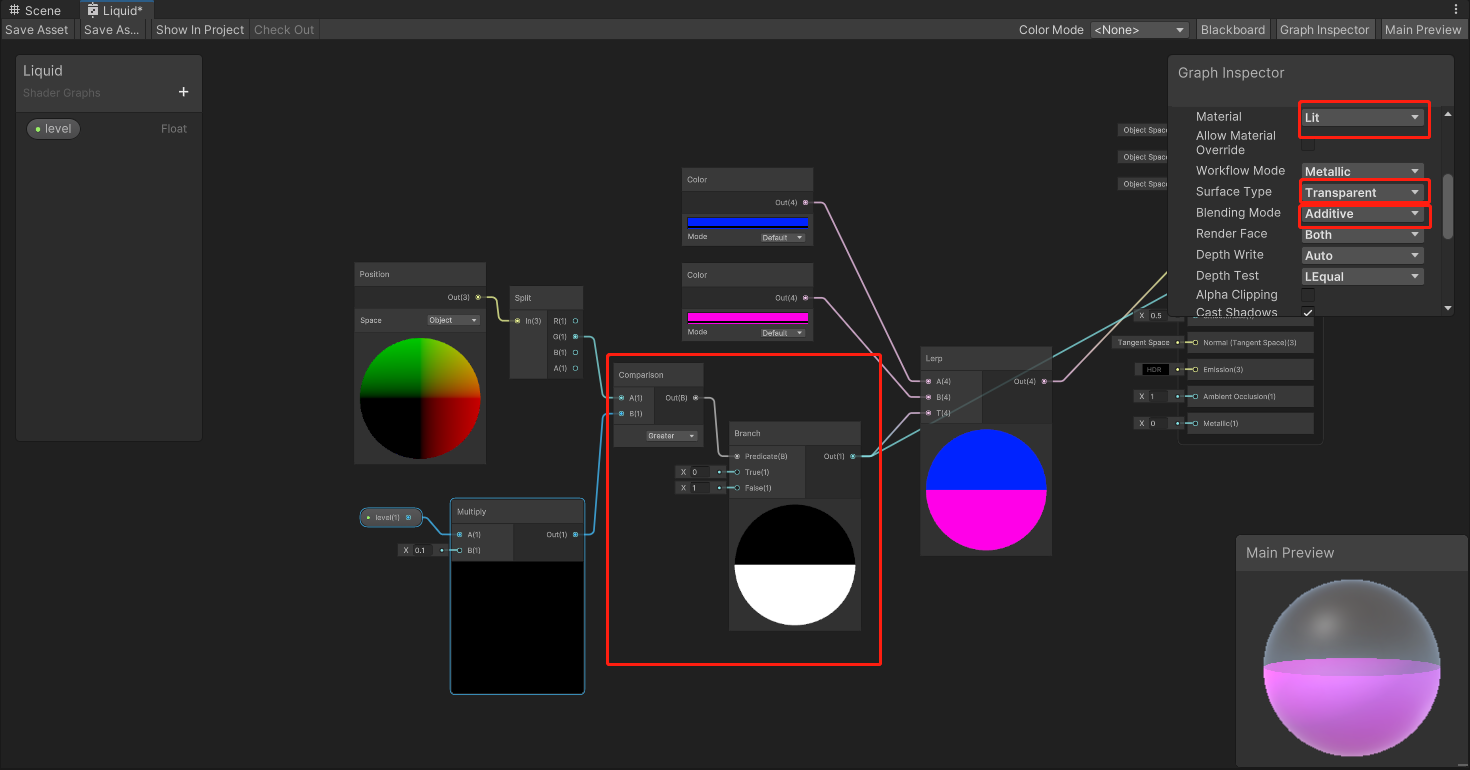
Lerping a Liquid
- Comparison $ Branch -> make division
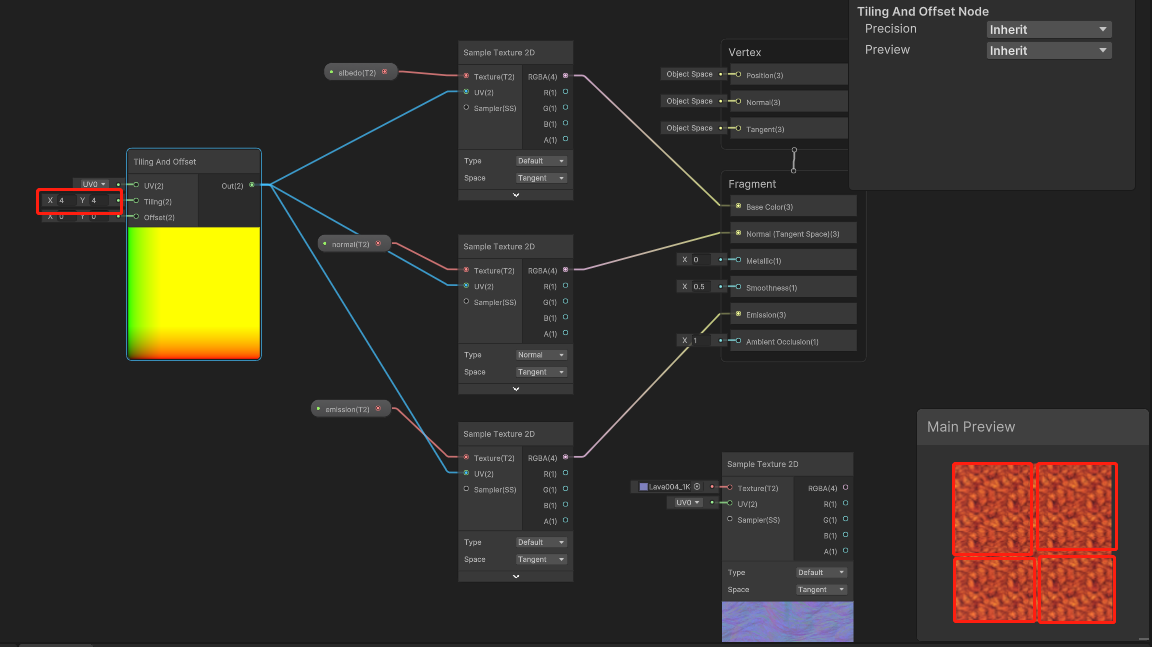
Tiling & Masking
Tiling
- offset: moving the UVs to seamlessly snap together. -> for scrolling effect
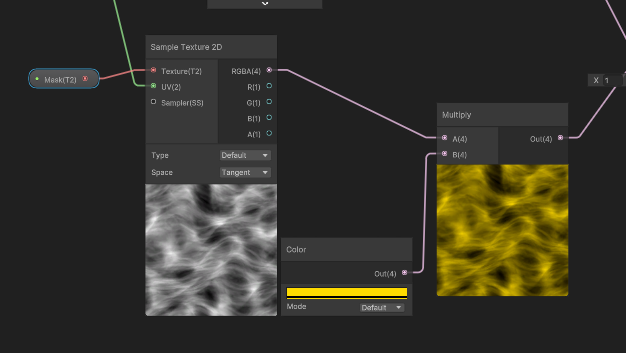
Mask
black section -> 0: can be where you don’t want anything to come through
white section -> 1: can be where you do want colors to come through.
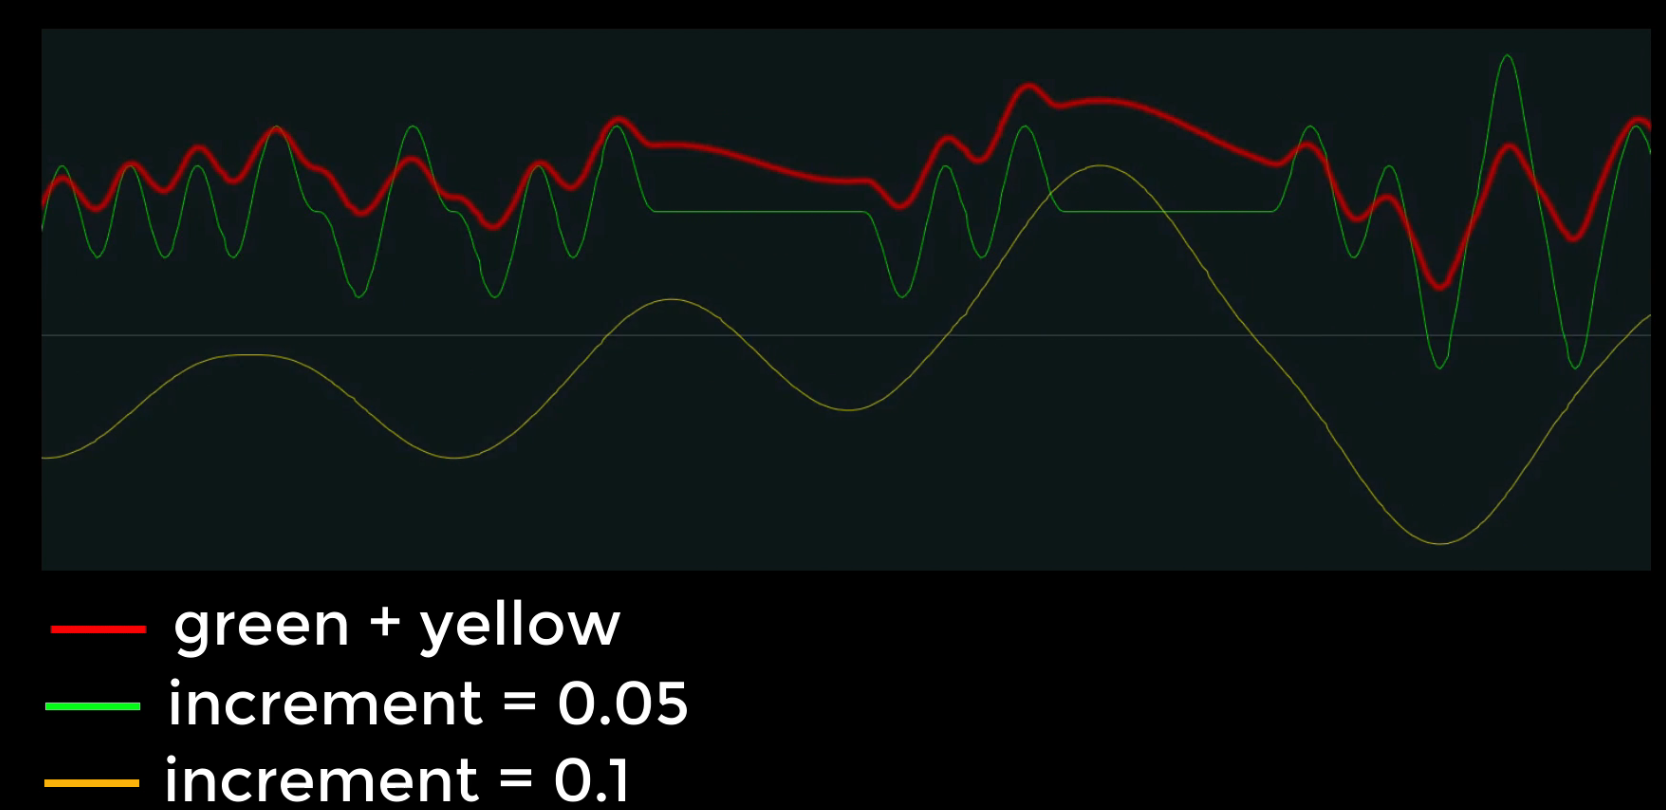
Procedural Generation
One dimensional noise appears as a line graph
Two dimensional noise can be used to generate textures or the height values of a landscape.
Perlin Noise
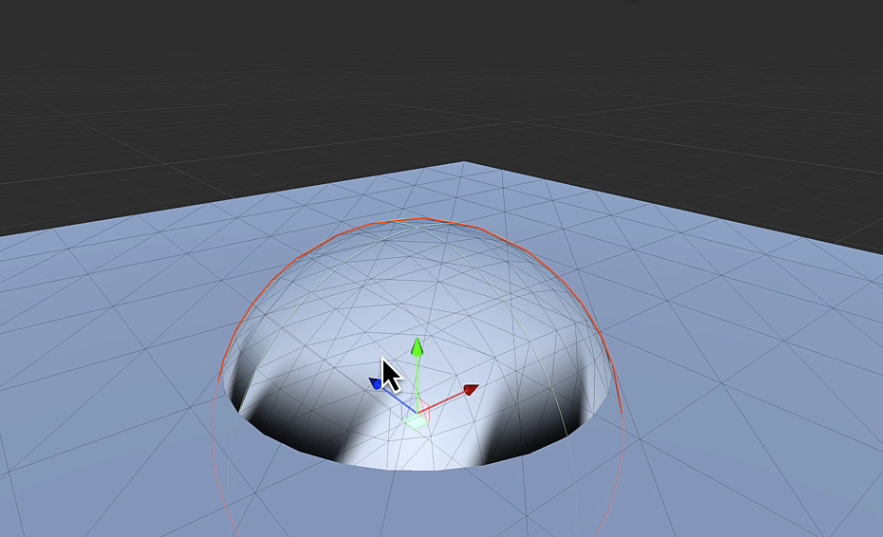
Noise Vertex Displacement
Node
- Combine
- Sine
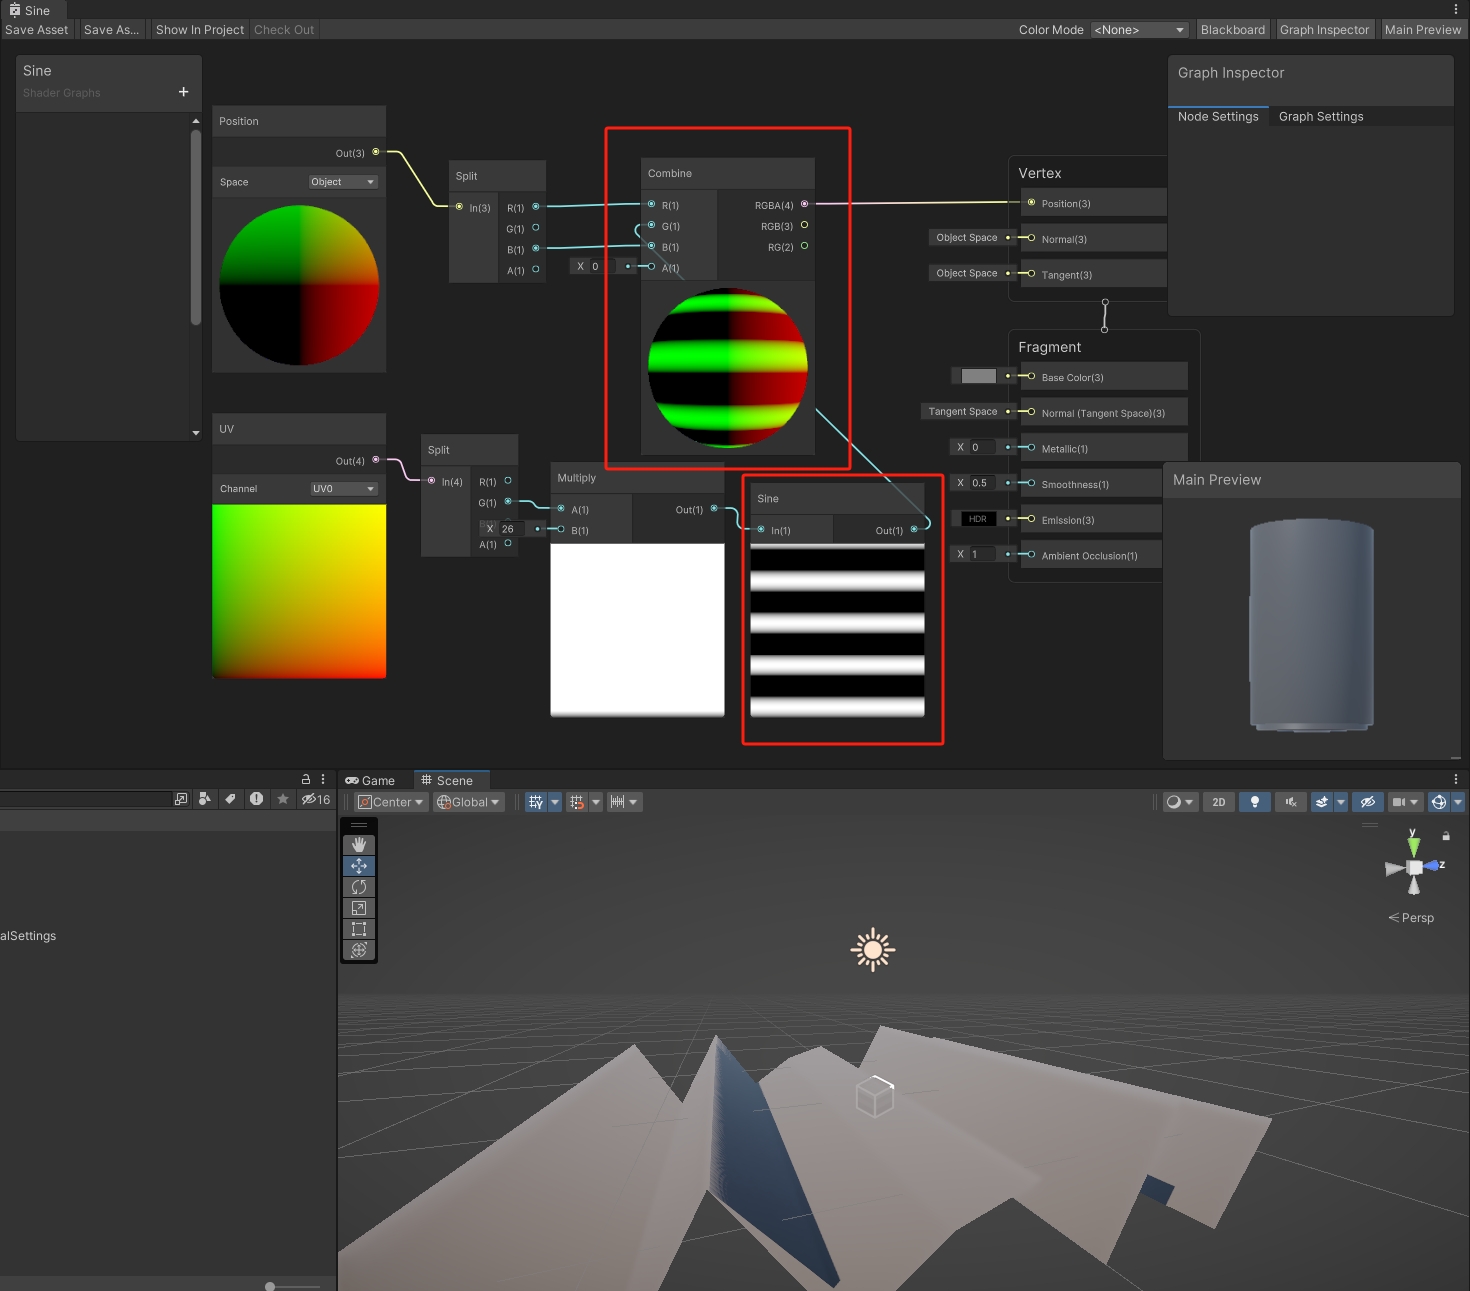
- Simple Noise
Texture_PCG
SmoothStep: Returns the result of a smooth Hermite interpolation between 0 and 1, if the value of input In is between the values of inputs Edge1 and Edge2 respectively. Returns 0 if the value of input In is less than the value of input Step1 and 1 if greater than the value of input Step2.
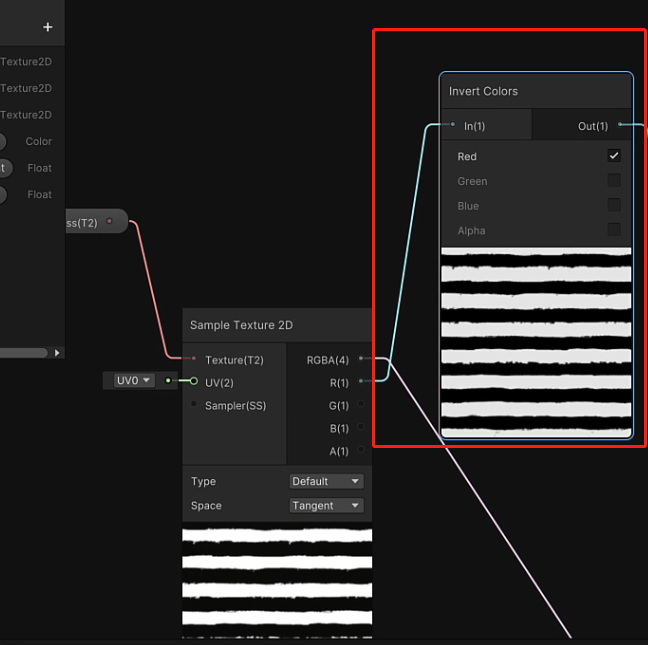
Seamless
- invert colors
- make top and bottom symmetrical
Voronoi

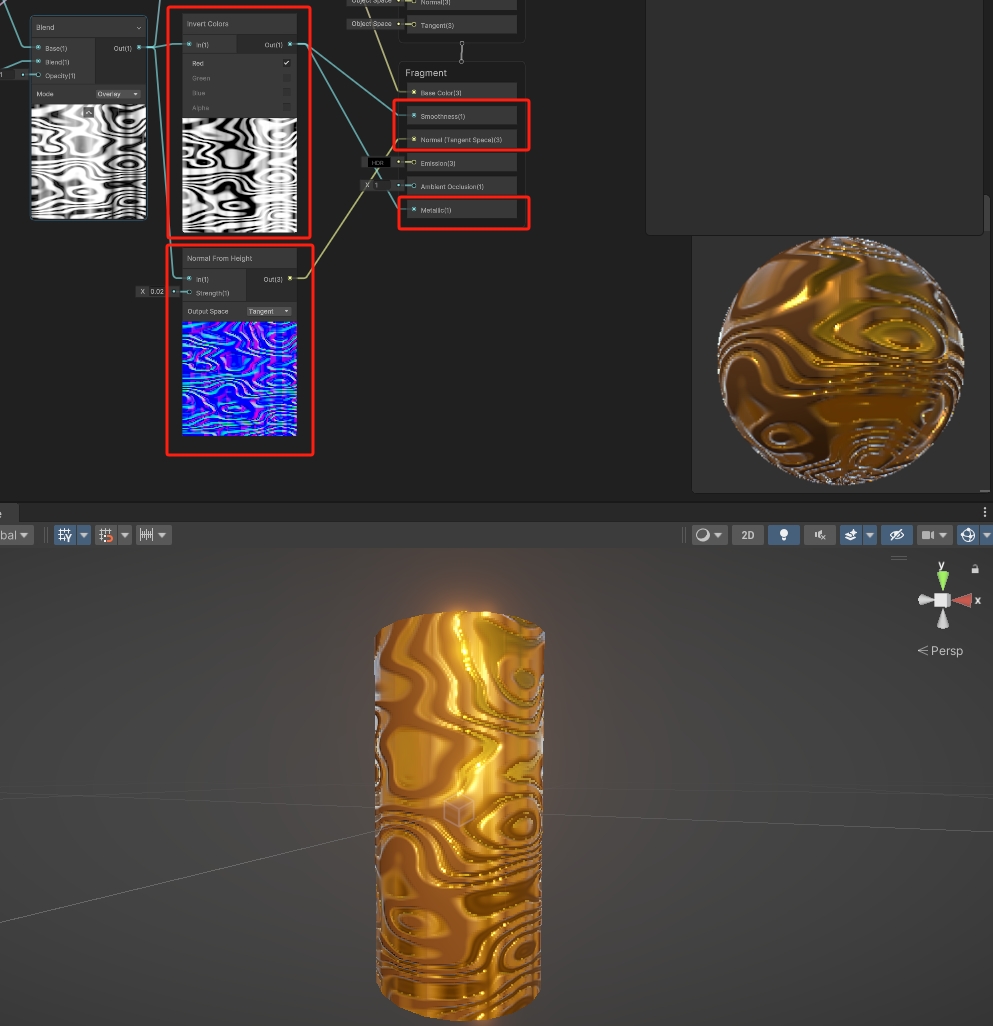
Normal from height / Smoothness / Metallic
from gray scale -> Lit
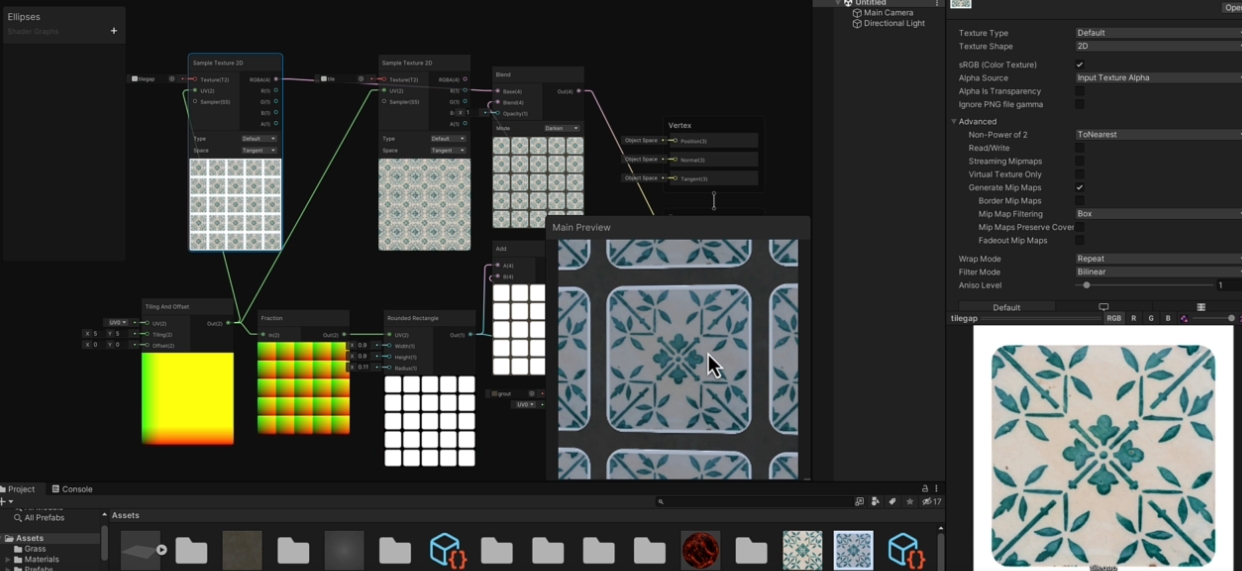
tile based texture: Shape

turn to gray scale image
Rectangle node

Ellipse / Polygon / rounded rectangle: same as rectangle
Voronoi
- Perlin Noise: creates sort of natural looking landscapes
- Voronoi: only allows you to divide space up in the way that humans actually do
- dividing space up based on closest points
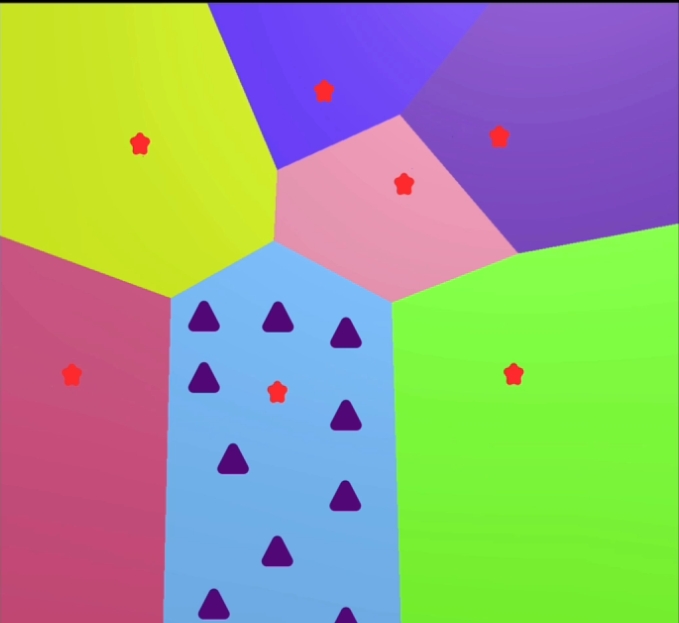
eg. Curtain Effect
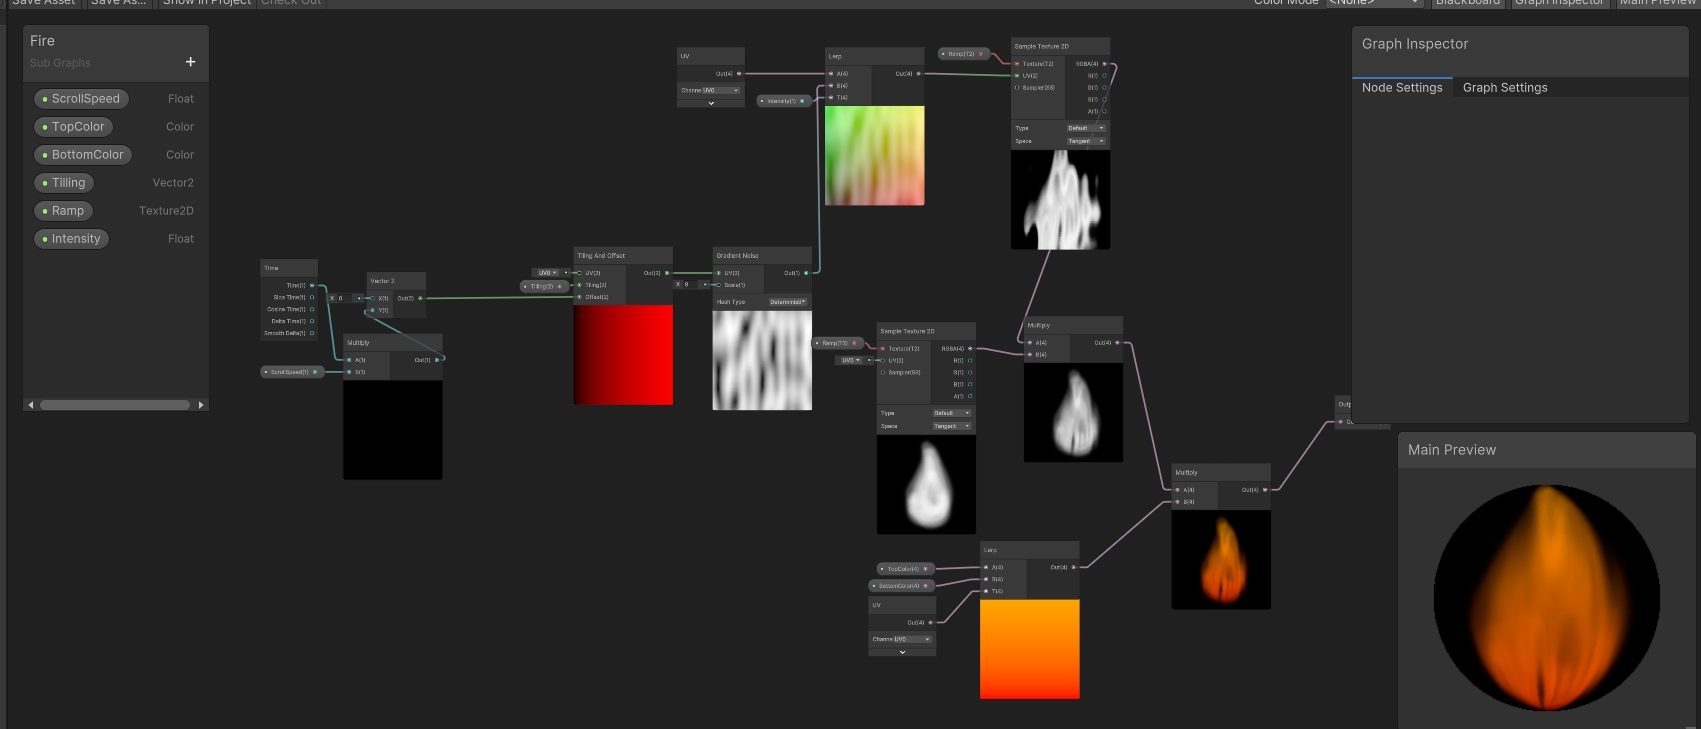
Eg. Simple Fire - Gradient Noise
Eg. UV Ripple: UV Lerp with Voronoi
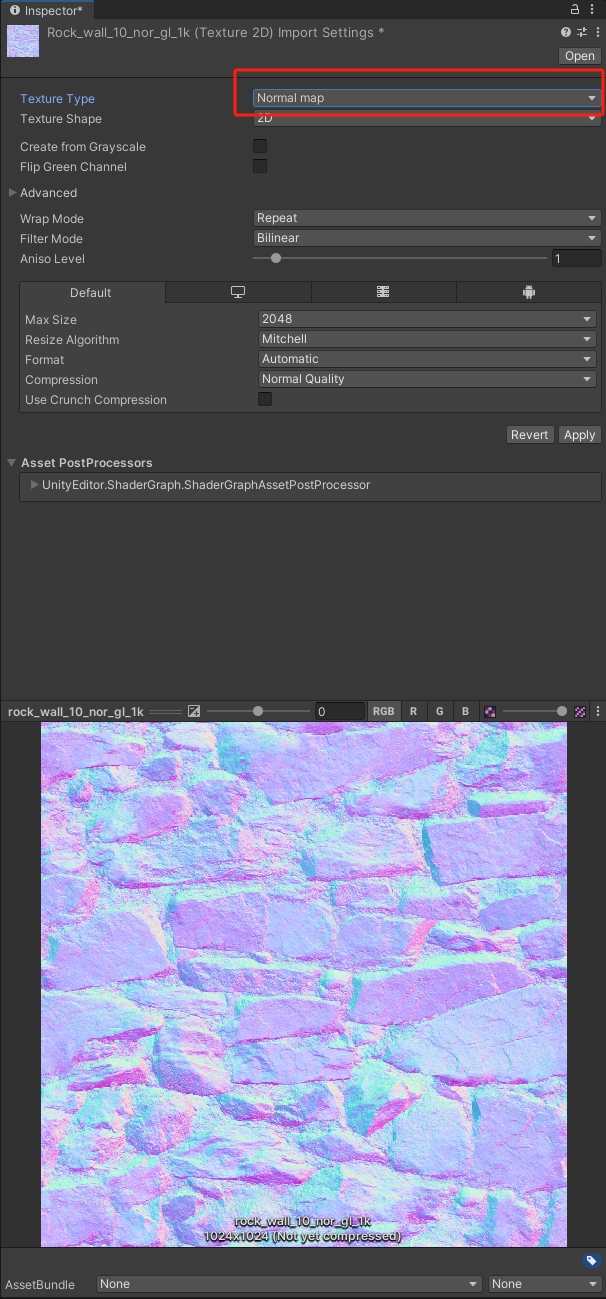
Illusion of Depth
How does bump map works: change the process of rendering -> fake the fact that the normal could be at a different angle and create bumps
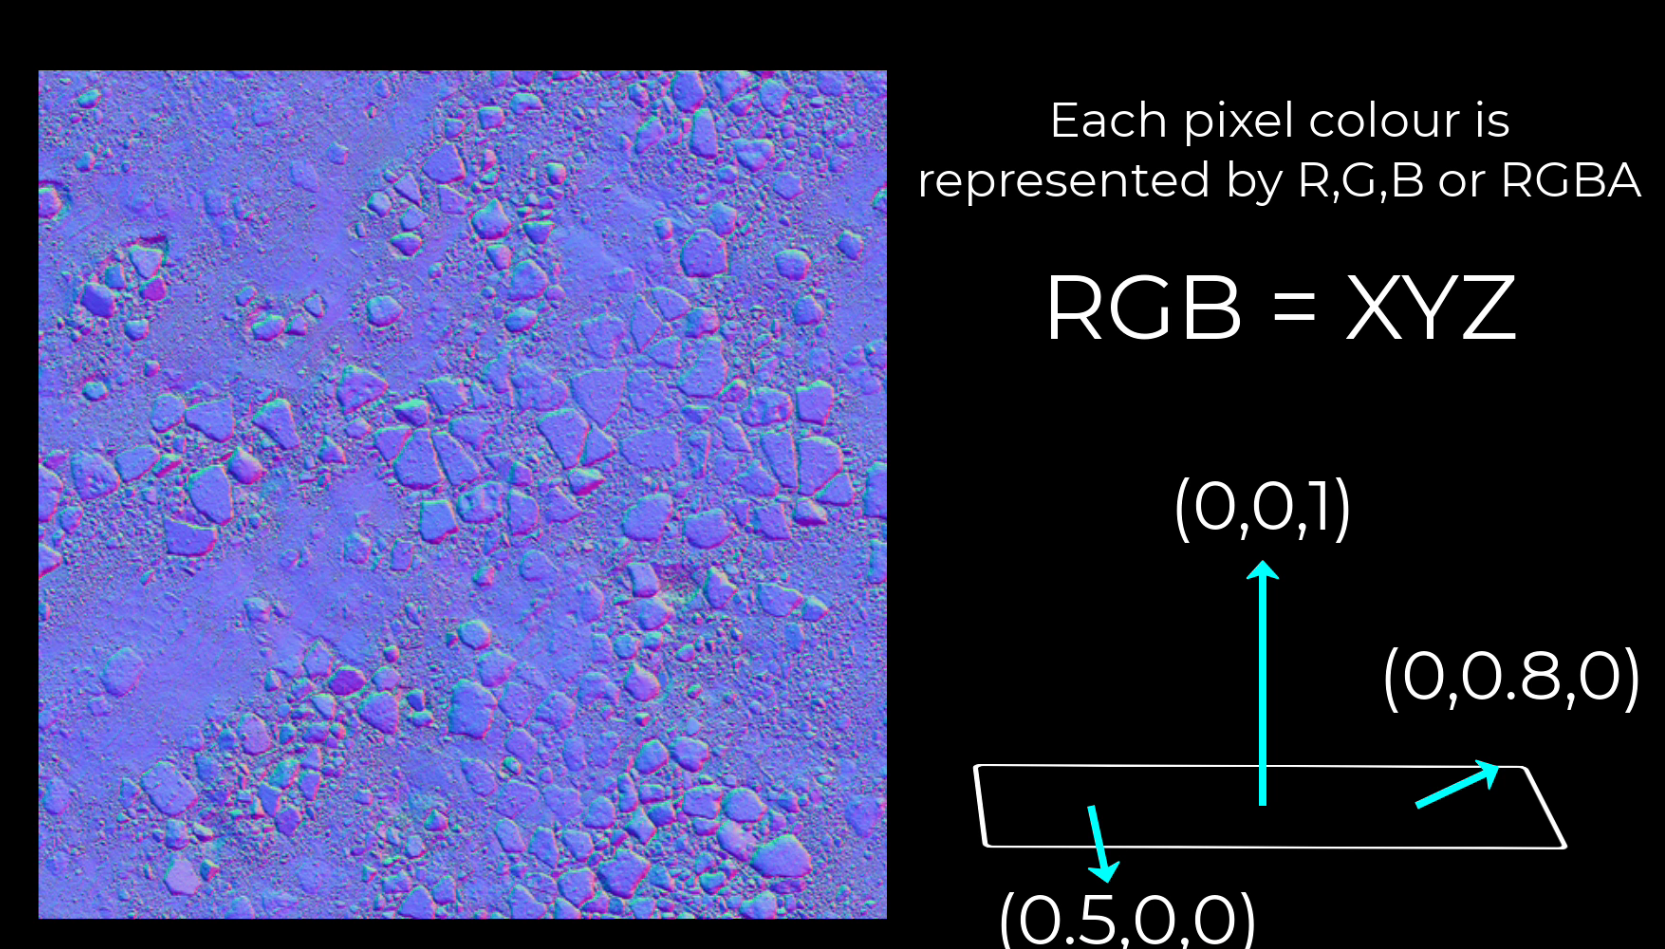
- set normal map: remap -1 to 1, rather than 0 to 1
- If the Z is a positive value, then it is facing towards the camera, which means the camera can see that side of the image, and therefore it can then be used for calculating lighting.
- If the Z is negative, then there’s no lighting on that particular side of your polygon
- Node: Normal Strength / Normal Blend

- Node: Swizzle: Get Channels
- Node: Normal Reconstruct Z: Get Z value based on RG. (Use this when using slider to interpolate two normal map)
Eg. Lava Ripple
- normal map & mainTex UV Lerp with Voronoi
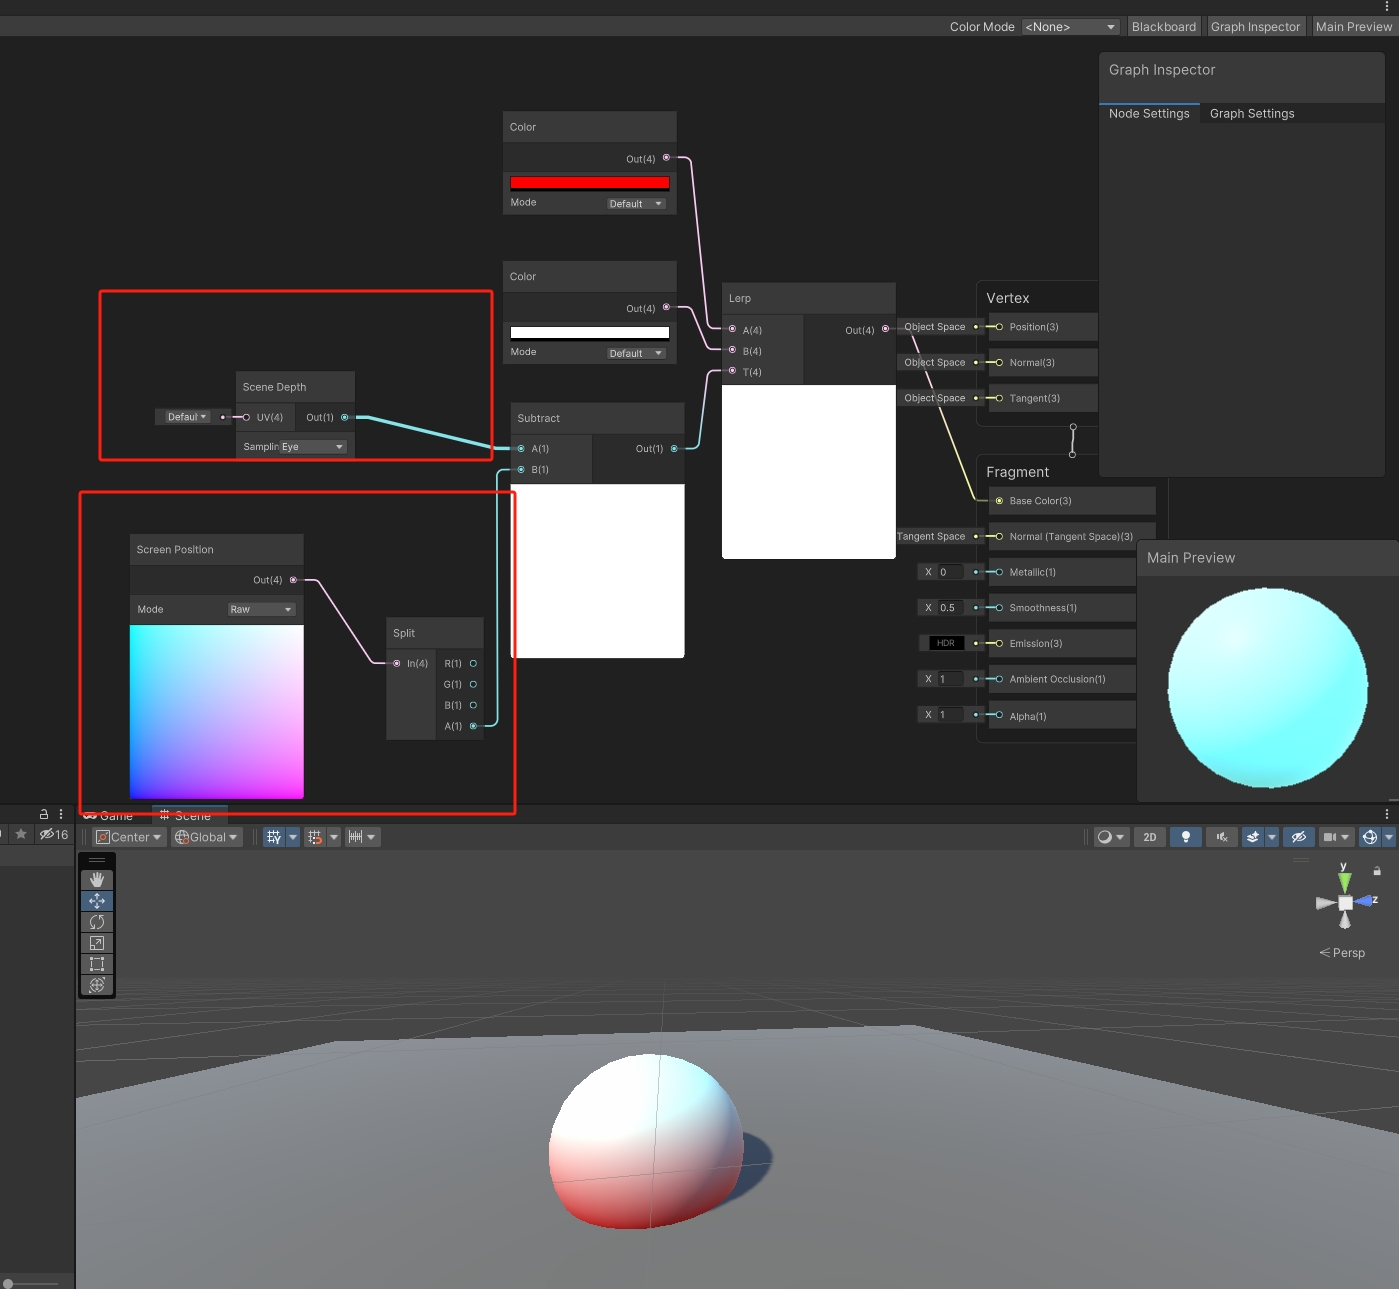
Depth Intersection
Node:
Scene Depth
Screen Position
it’s the shorter of the two between the same depth or the screen positions w value that’s going to indicate which pixel gets drawn on the screen.
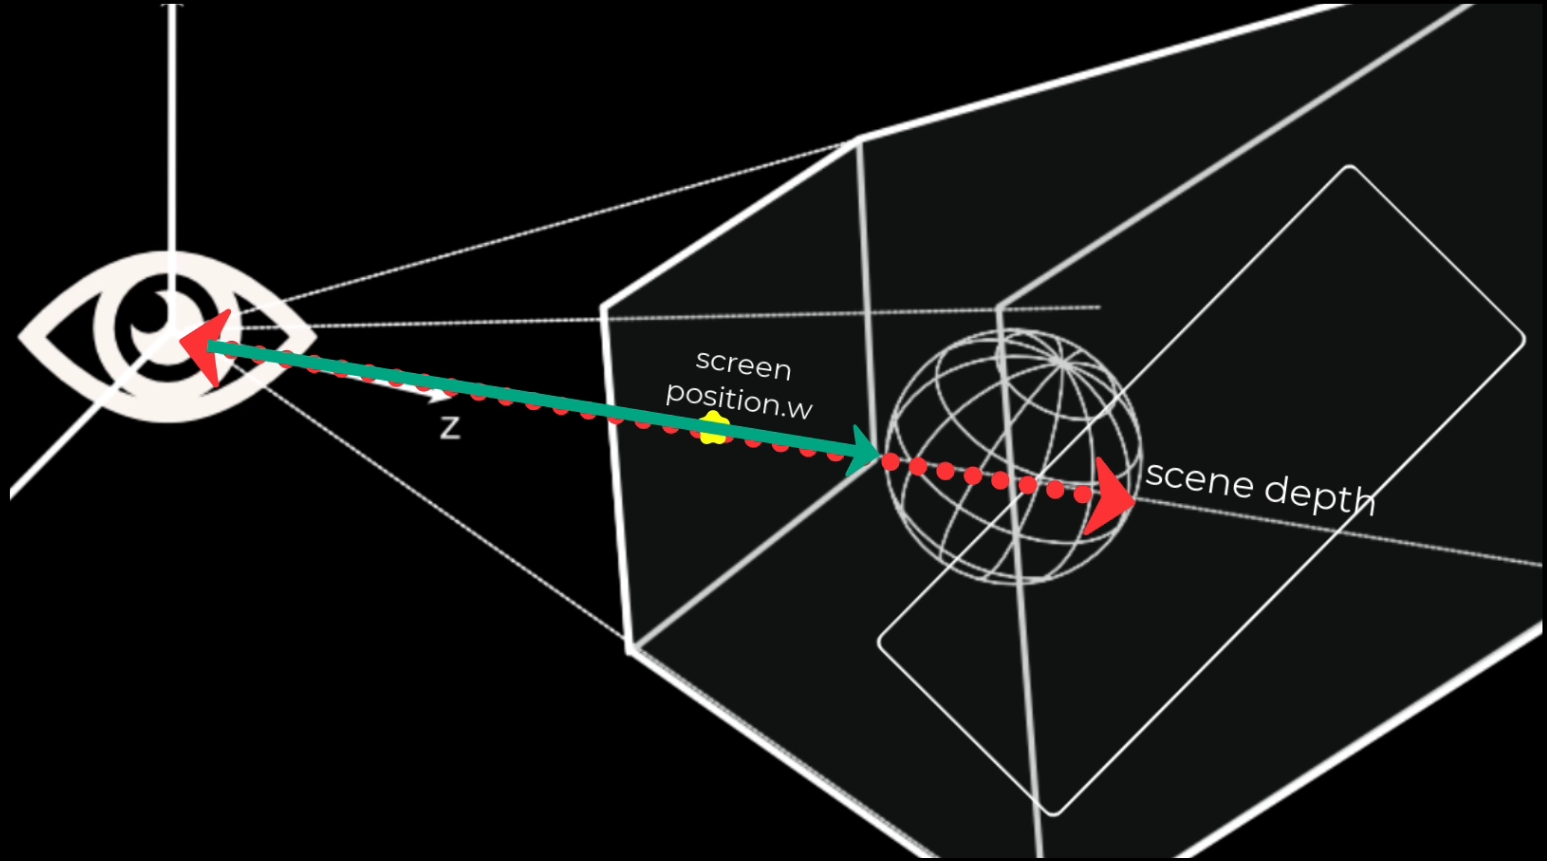
Screen Position W come from Clipping: Clipping is when the graphics card decides if a vertex is within the camera’s viewing volume
W: representative of the depth into the scene of our fragments
https://carmencincotti.com/2022-05-02/homogeneous-coordinates-clip-space-ndc/
Eg. Depth intersection
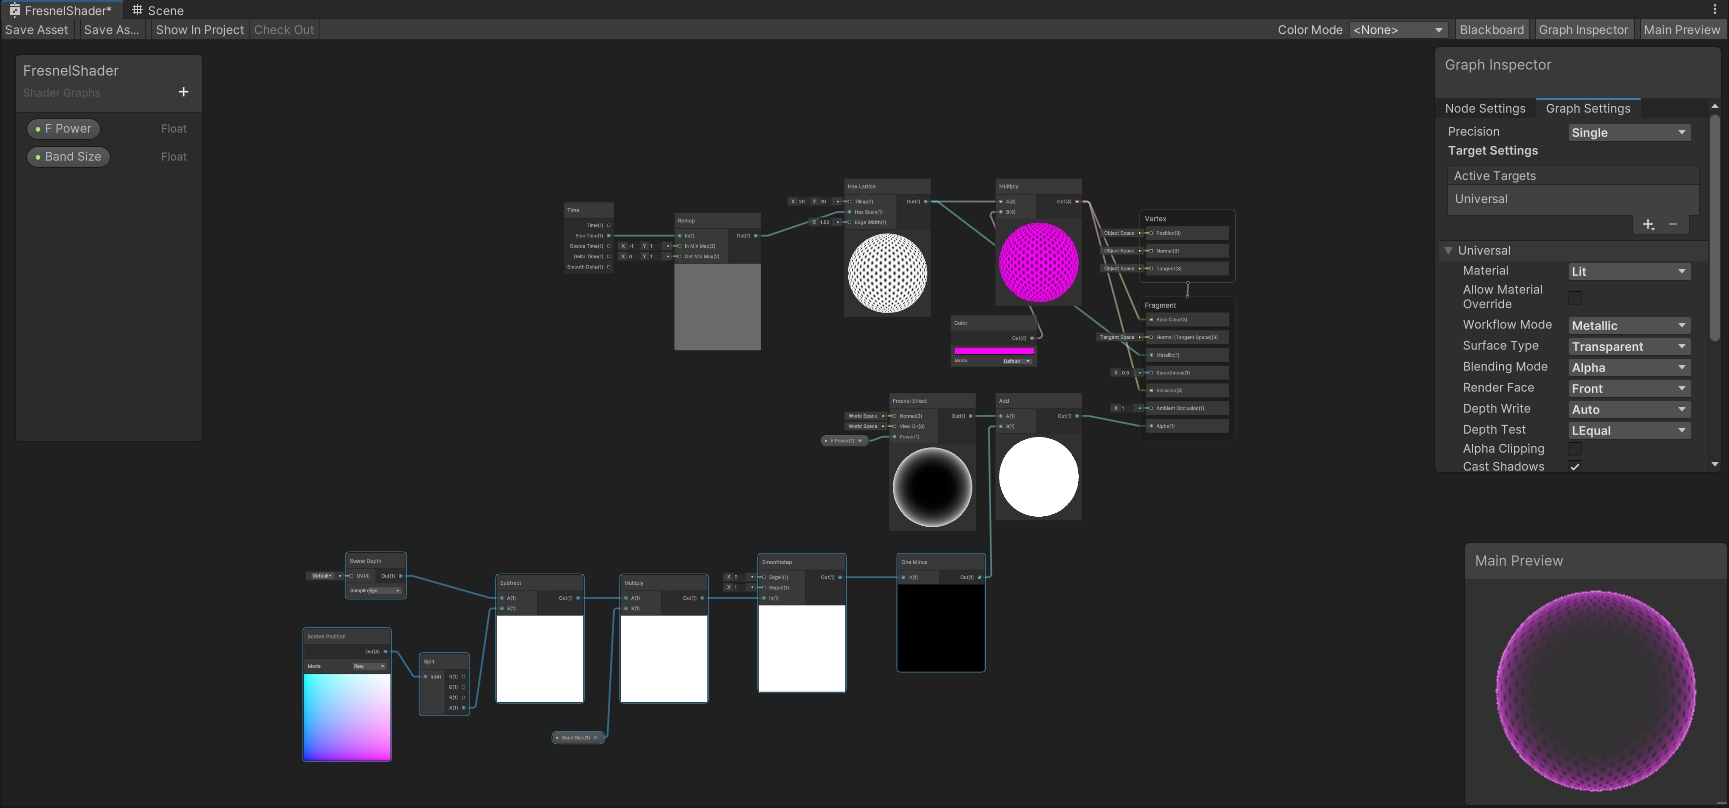
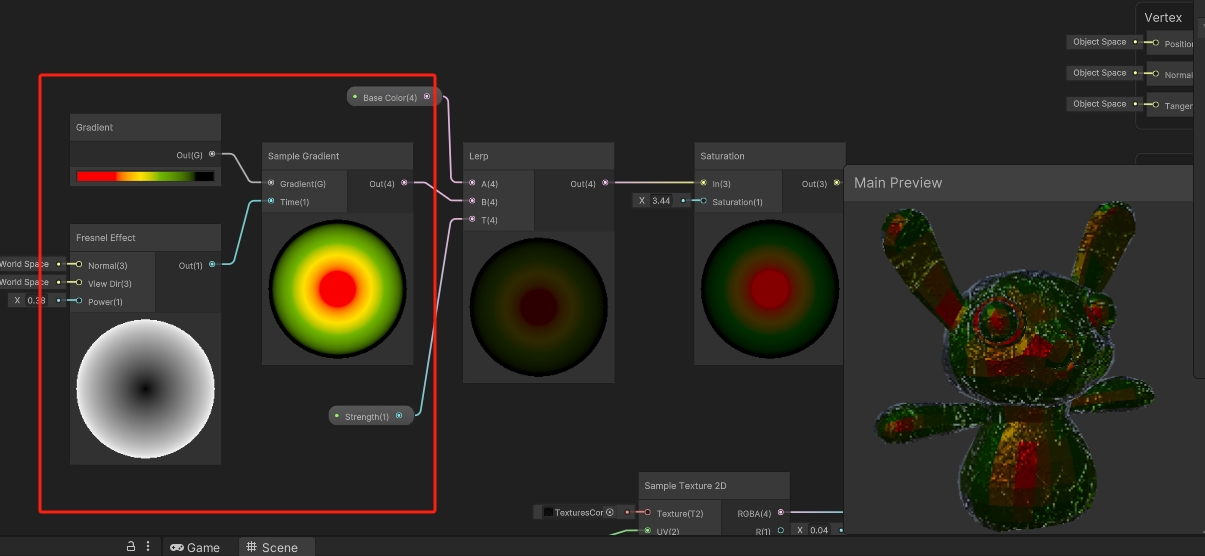
Eg. Forcefield - Fresnel
Eg. Water - Voronoi ripple
Tricks of Light
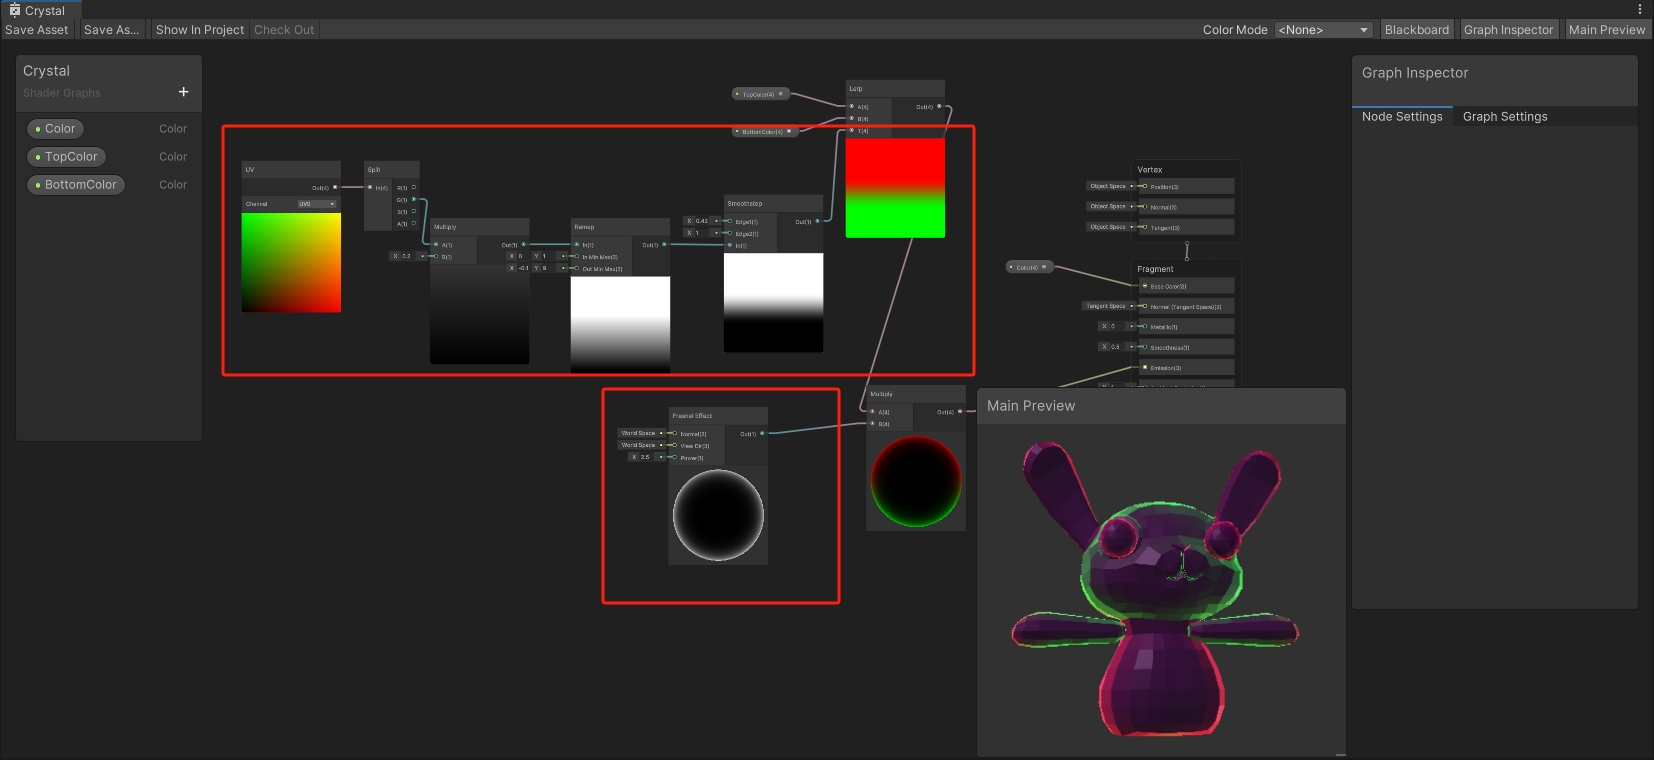
Eg1. Crystal Effect
- Fresnel
- UV -> smoothstep(division) -> lerp (mix and remap color)
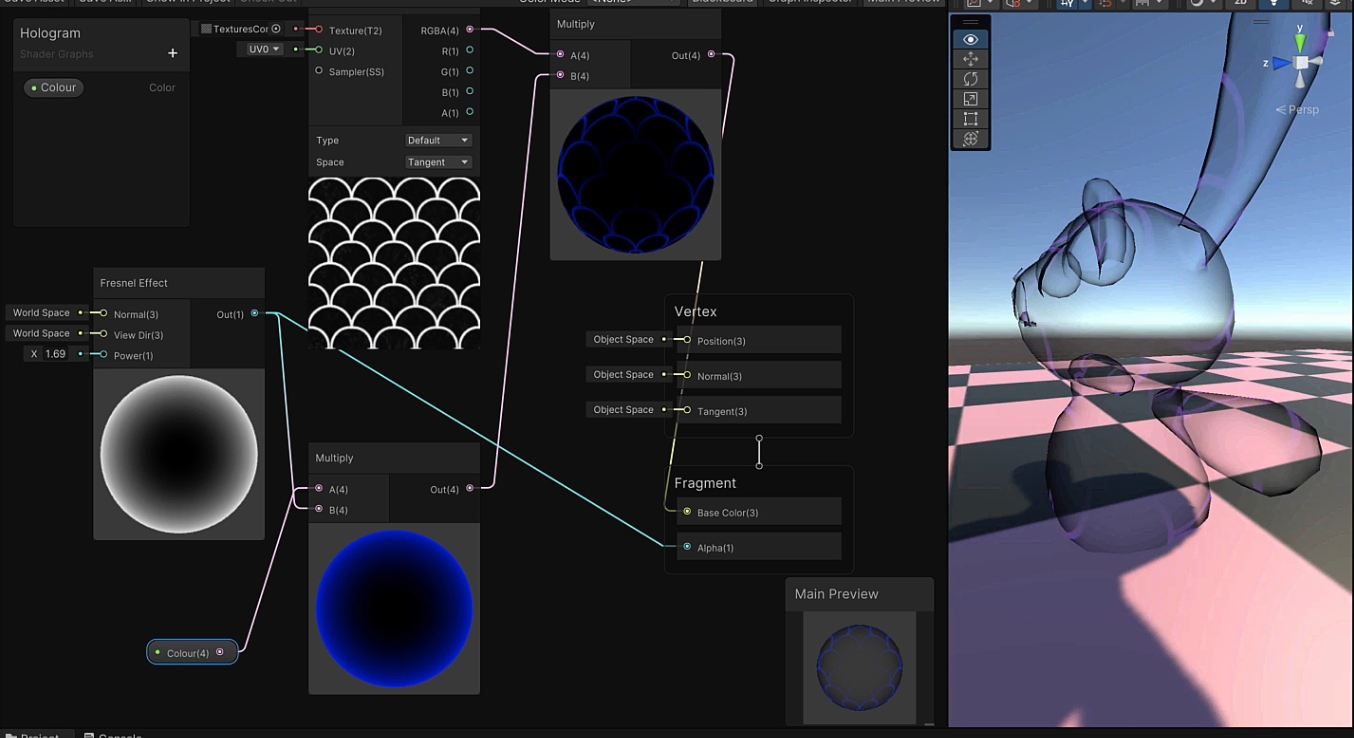
Eg2. Holograms
- Fresnel
Eg3. Refraction
- doesn’t work on Built-in: The executed HLSL code for this Node is defined per Render Pipeline, and different Render Pipelines may produce different results
- Scene Color
- Normal Map -> bend the light
Eg4. Iridesence
- Gradient -> Fresnel
Advanced Water - wiz particle system
- Depth: Scene Depth - Screen Position
- Fresnel effect
- Scrolling: Time node + tilling And offset
- Refraction: Normal map + Screen Position -> Scene Color
- Wave: Gradient Noise + Object Position -> Vertex Position
- vertex color : for change the Color over Lifetime attribute in particle system
Misc
SubGraph
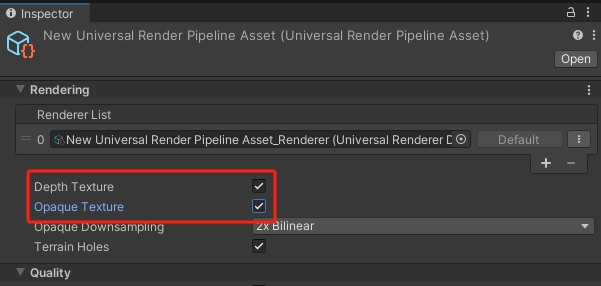
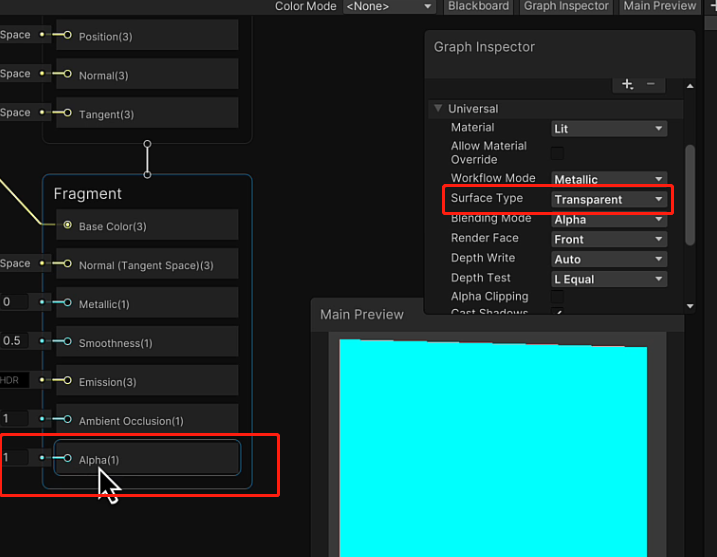
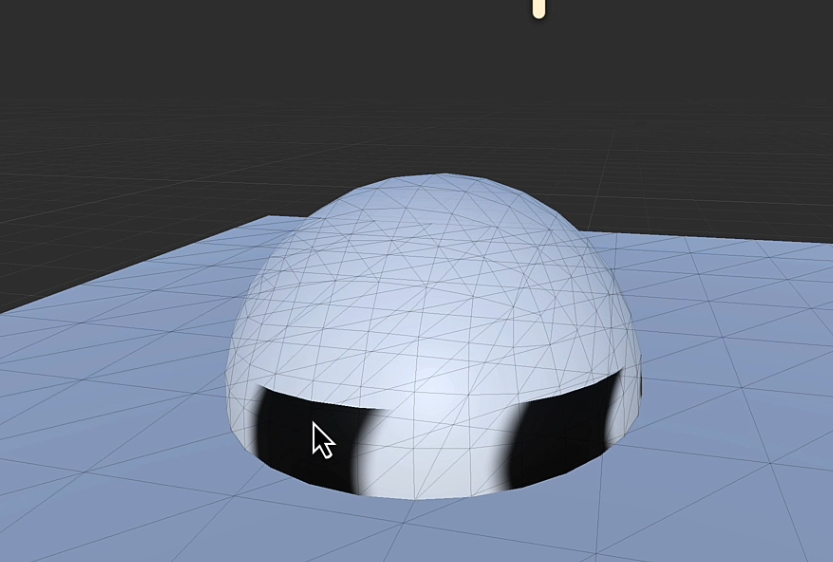
Transparent
- determine whether part is transparent or not
- white -> 1 -> opaque
- black -> 0 -> Transparent
remap
make sure using correct texture -> make shader less complicated
Blending Mode

- additive: add the pixel value for what’s behind -> especially for transparent: add black (0) -> show background color
SmoothStep & Step
One Minus: invert color for only gray scale image
1
2
3
4
void Unity_OneMinus_float4(float4 In, out float4 Out)
{
    Out = 1 - In;
}